The plugin allows customizing thumbnail sizes, display settings, and type of relations. The plugin is using original WordPress taxonomy. It returns generated HTML, that is essential for page load speed of blogs that use many Javascript widgets.
INSTALLATION
Modern Way:
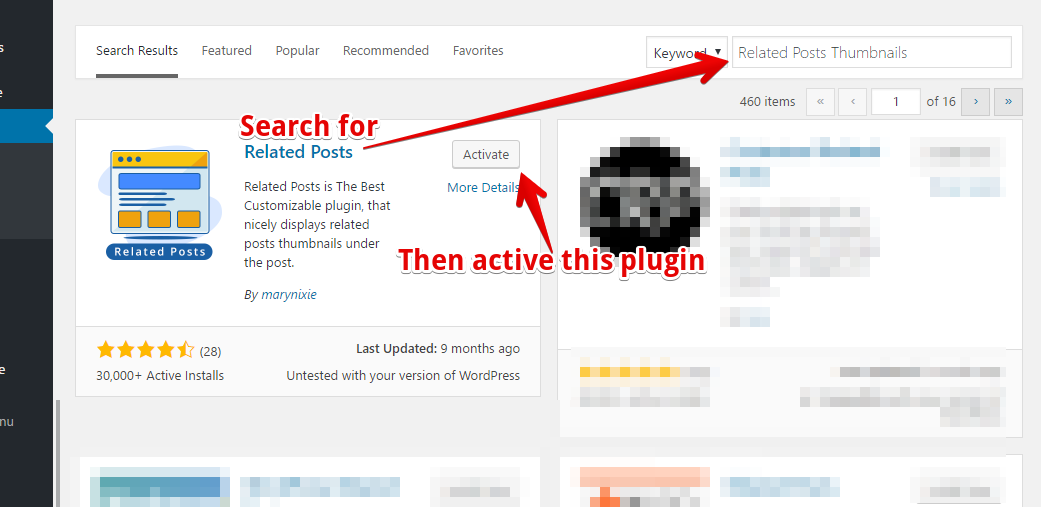
- Go to the WordPress Dashboard “Add New Plugin” section.
- Search For “Related Posts Thumbnails”.
- Install, then Activate it.
Old Way:
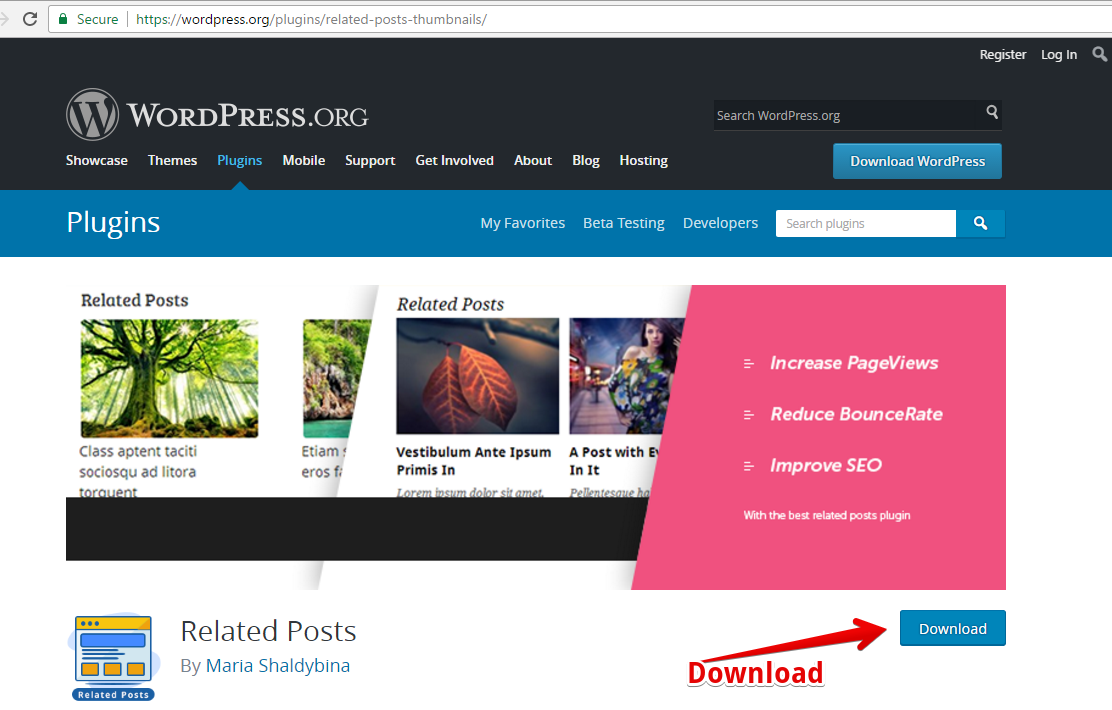
- Download plugin
- Unzip (if it is zipped) and Upload `
related-post-thumbnails`folder to the/wp-content/plugins/directory - Activate the plugin through the ‘Plugins’ menu in WordPress
DISPLAY
Thumbnails are arranged in columns under the post with related posts title under each post thumbnail.
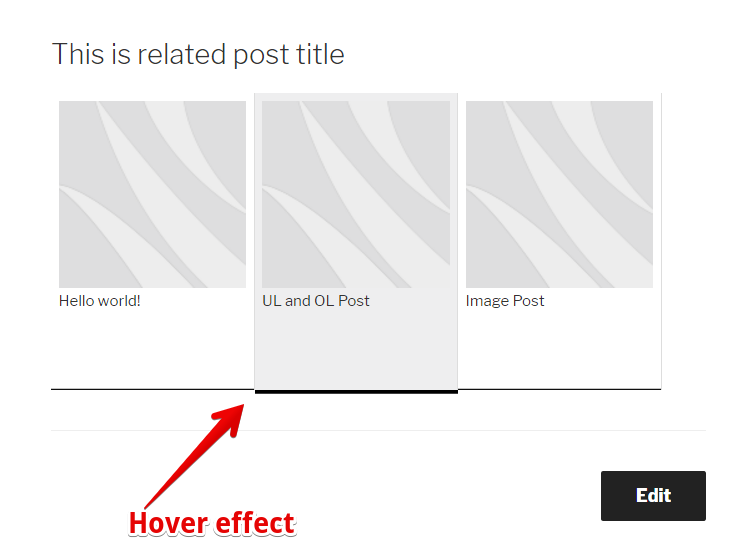
* Colors of background, border, text, text sizes and background color on mouse over can be customized.
* The plugin allows the customizing number of related posts to display, top text, style settings – background colors and text formatting.
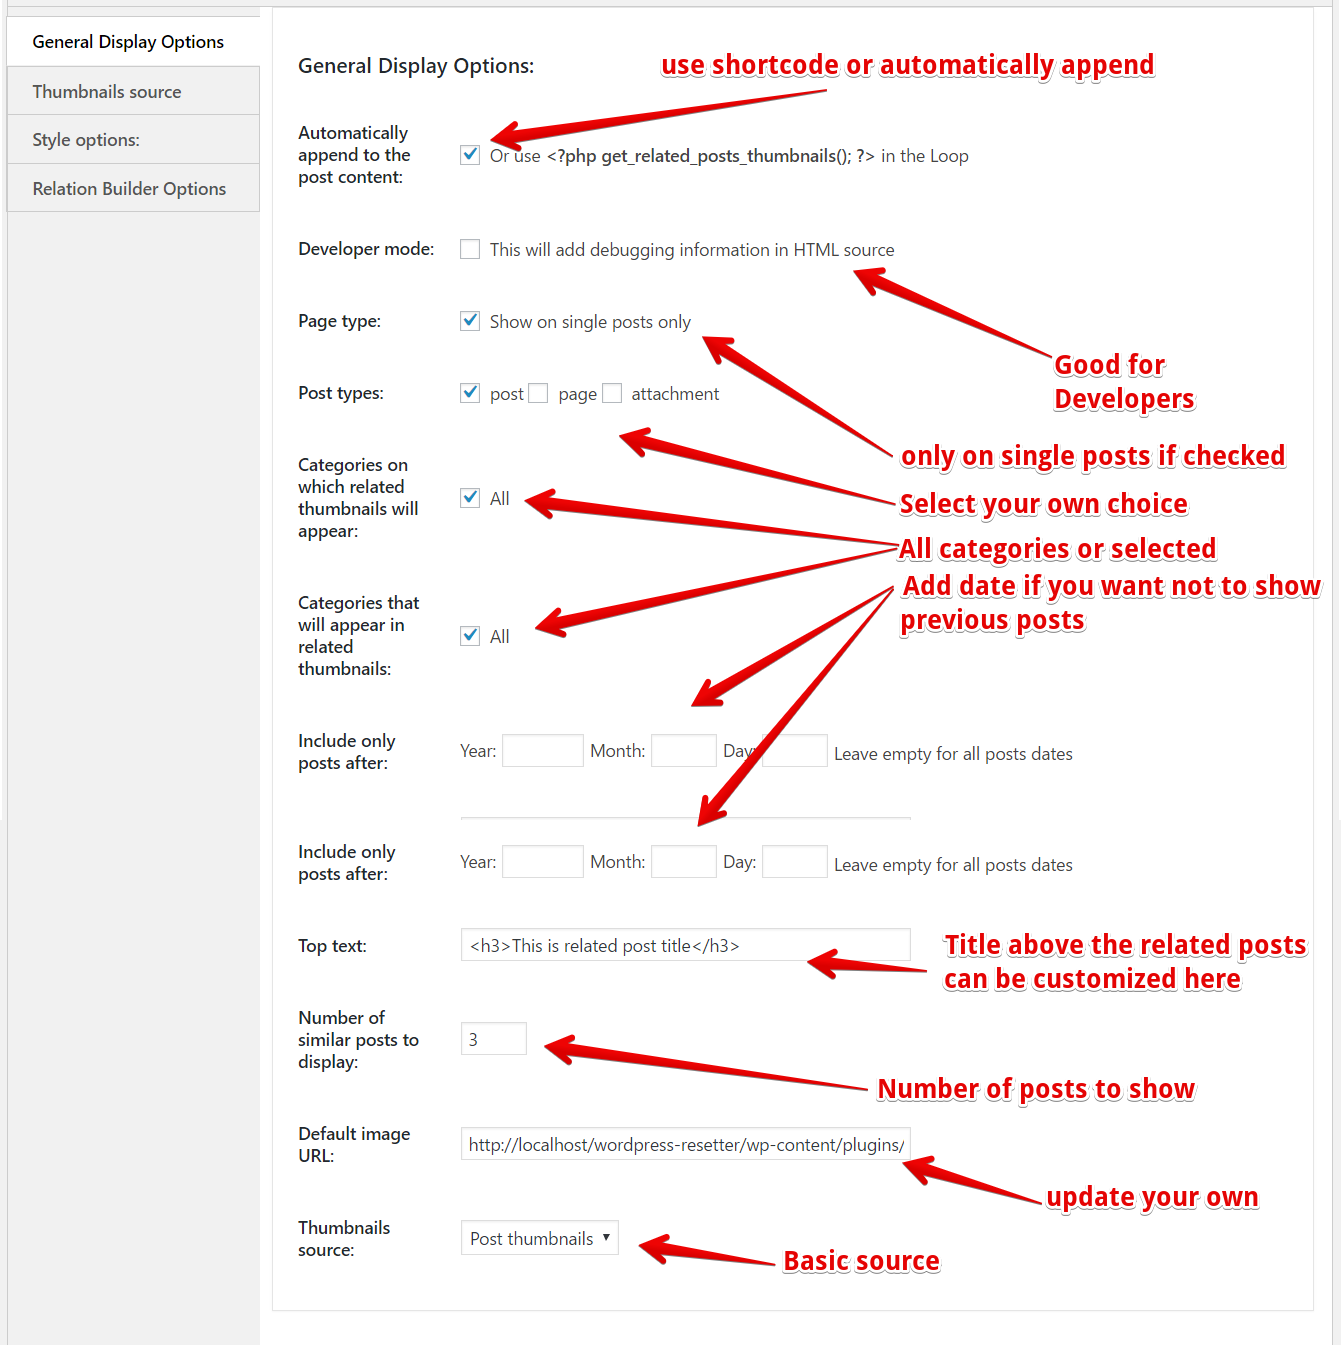
You can specify where to display post thumbnails – single and main pages, or select specific categories.
By default, plugin appends related posts thumbnails under post content. You can turn off automatic appending in plugin settings and use php tag in the Loop of your theme.
Output style
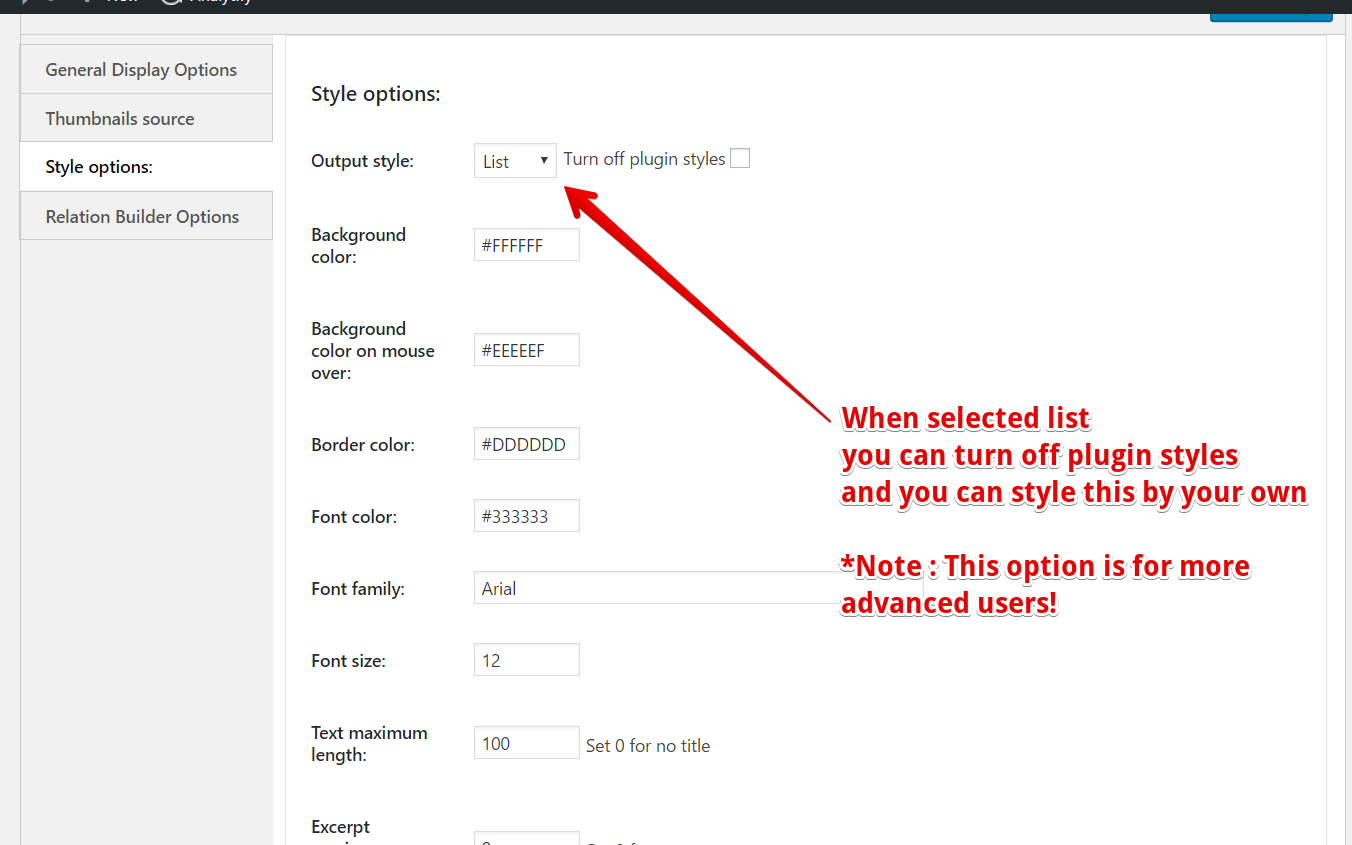
Starting from 1.2.7 version there is an option to select output style. By default, it will be same as in previous versions – based on blocks. You can now select the version, based on “List” and you can also turn off plugin CSS completely. This is for more advanced users who wish to customize output as they desire.
List style produces
-
- *clean output, without HTML errors and it is much more SEO friendly.
- *The plugin uses Block output style by default to support previous versions, and because Block style uses inline styling with absolute positioning for some elements it will more likely to work in all themes.
- *Check List output style.
Use this list style if possible!!!
Horizontal list
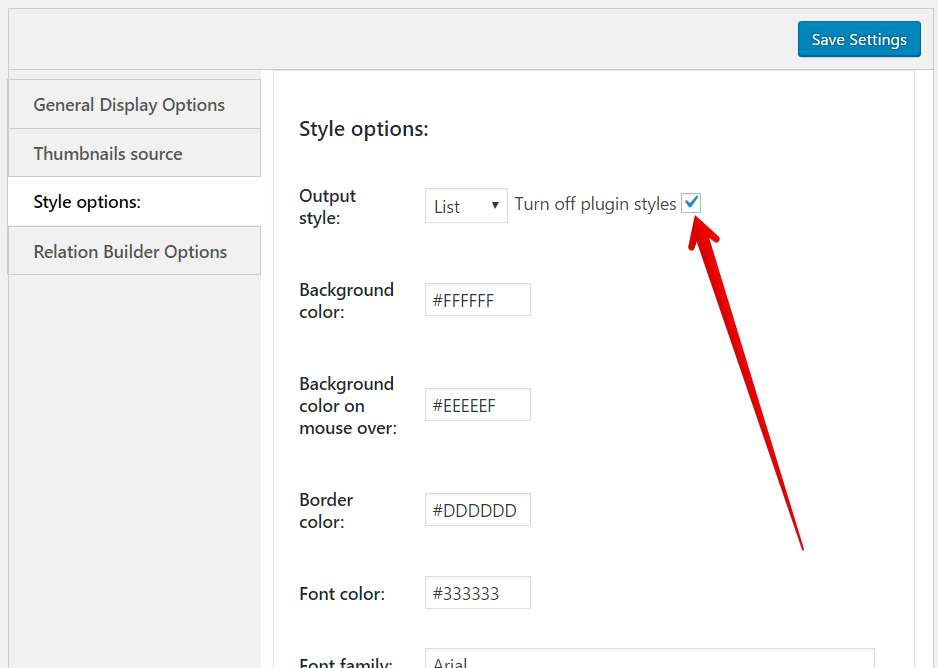
- You can choose Output style as “List” in plugin settings
- Set “Turn off plugin styles” flag
- Now you can use your own CSS to customize output. For horizontal display you can use suggested CSS (you need to paste it in styles.css file of your theme):
#related_posts_thumbnails {
list-style-type: none;
list-style-position: inside;`
padding: 0px;
margin: 0px;
}
#related_posts_thumbnails li {
padding: 10px 0;
border-bottom: 1px solid #ccc;
}
#related_posts_thumbnails li img {
margin-right: 8px;
vertical-align:text-top;
}
Center output
This is also a popular question how to center thumbnails on the page. Styles that go with plugin display it aligned to the left side of post container.
*The easiest way to center thumbnails without CSS editing is to use plugin’s tag instead of automatic appending in your theme files. Put this tag in div with desired padding style, like:
Any other display editing
#related_posts_thumbnails {
list-style-type: none;
list-style-position: inside;
padding: 0pt;
margin: 0pt;
}

#related_posts_thumbnails li {
float: left;
margin: 0pt;
padding: 5px;
display: block;
border-right: 1px solid #DDDDDD;
background-color: #FFFFFF;
}

#related_posts_thumbnails li:hover {
background-color: #EEEEEF;
}

#related_posts_thumbnails li a {
border: 0pt none;
line-height: normal;
font-size-adjust: none;
font-stretch: normal;
}

#related_posts_thumbnails li a+a {
display: block;
width: 110px;
overflow: hidden;
height: 75px;
color: #333333;
text-decoration: none;
font: 12px Arial;
}

#related_posts_thumbnails img {
padding: 0px;
margin: 0px;
border: 0pt none;
}
TEXT BLOCK
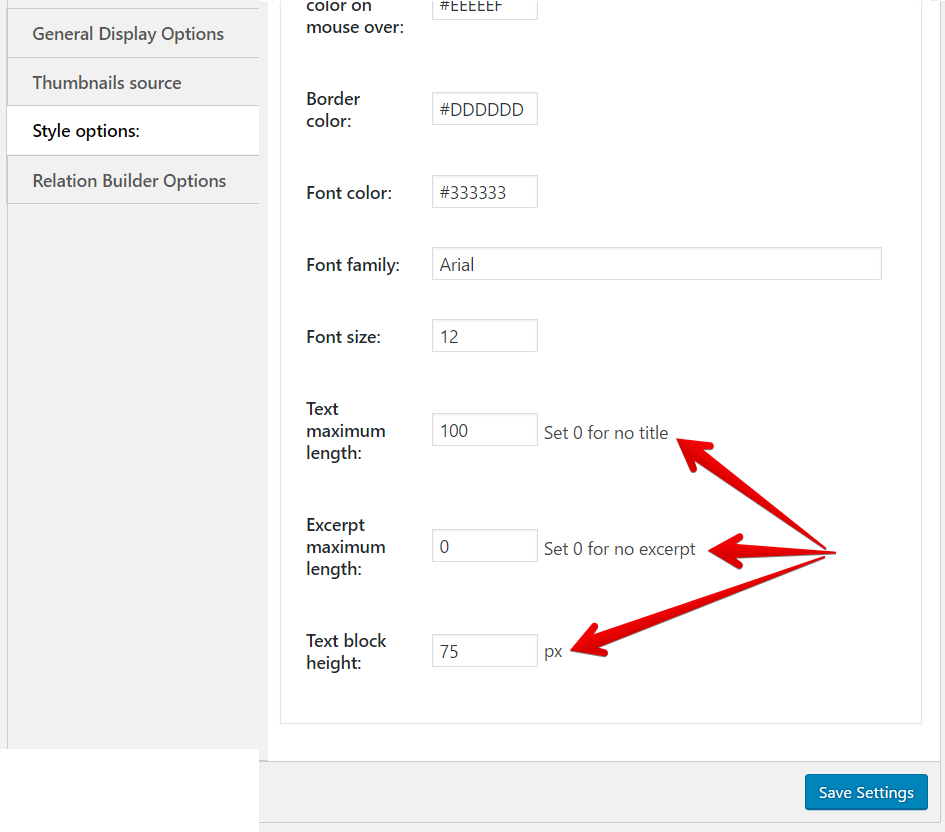
*Title – set posts title maximum length or 0 for no title
*Excerpt – set excerpt maximum length or 0 for no excerpt
*Text block height – set height in pixels of the block appeared under the image.
Note: *In the latest version of plugin top text is showing up only if you are using automatic appending in plugin settings. If you are using PHP tag, shortcode or sidebar widget top text will not show up to allow more customizable output. You need to enter it manually before PHP tag in theme settings, before shortcode in your post or in the widget title box.
RELATIONS
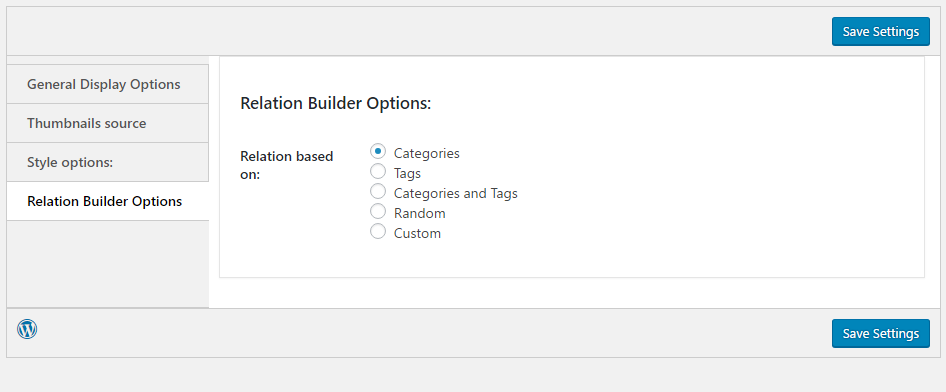
Relations between posts are based on Categories and Tags. You can specify what kind of relation should be used in Plugin settings. It may be one of the following:
-Categories – relation is based just on similar post categories
-Tags – relation is based just on similar post tags
-Categories and Tags – posts that have similar tags or categories are considered as related
-Random – no relation restrictions will be taken into account. Posts from different categories and tags may be shown. This might be useful for blogs with few posts.
CATEGORIES
You can set:
–Categories on which related thumbnails will appear. In this parameter, you can set on posts from which categories related posts thumbnails will be displayed. The default value is “All”.
–Categories that will appear in related thumbnails. In this parameter, you can specify what categories should be shown among related posts thumbnails. The default value is “All”.
THUMBNAILS
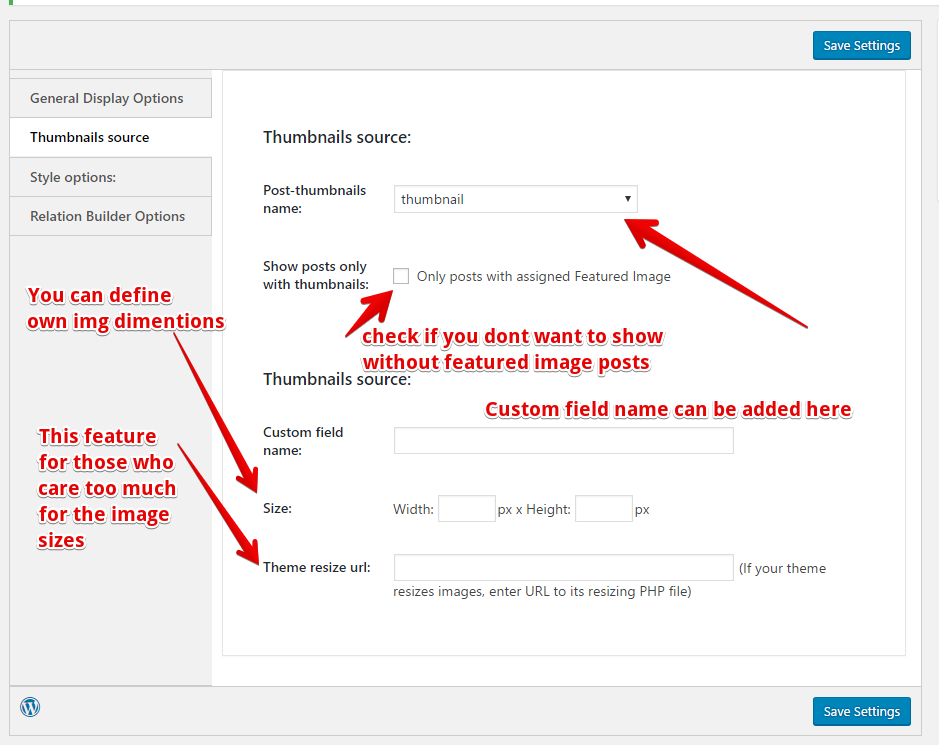
This plugin supports two types of thumbnails sources – WordPress post thumbnails feature and post custom field.
Custom field
If you input your thumbnail URL on post edit page under the post in the specific field, like “thumbnail image URL” you are using “Custom field”. In plugin options set Thumbnails source as Custom field.
Make sure your Custom field name in plugin options is exactly as it is stored in the database. For example, in Thesis “thumbnail image URL” can be stored as “thesis_thumb”. You need to use that key name. You can find it in the database in post meta table. Or ask your theme developer what’s the key name of that custom field you use to specify thumbnail URL.
If your theme resizes your images, you can specify Theme resize URL. Here you need to fill in URL to PHP script used in your theme for resizing. You can find it from HTML source of your page, looking at src of resized image or ask your theme developer.
For example, you can see the IMG tag like the following:
So in Theme resize URL field you need to add this part of URL: link_to_my_theme_resize_script.php
If your theme does not contain such script, you can download image resizing script. For example, TimThumb resizes script:
http://code.google.com/p/timthumb/
Put it, for example, in your /wp-content/thumbnails folder and create thumbnails/cache folder with writable permissions for this script to store resized images.
Post thumbnails
By selecting ‘Post thumbnails’ as a source for thumbnails plugin displays post thumbnails depending on your WordPress settings. Your WordPress theme may or may not support WordPress Post Thumbnails feature introduced in WordPress 2.9.
Read more information about WordPress Post Thumbnails feature here – New in WordPress 2.9: Post Thumbnail Images.
If your theme doesn’t support this feature On plugin settings page you will see this message: Your theme has to support post-thumbnails to have more choices.
Read more information about WordPress Post Thumbnails feature here – New in WordPress 2.9: Post Thumbnail Images.
Read more information about WordPress Post Thumbnails feature here – New in WordPress 2.9: Post Thumbnail Images.
This means that you limited to two thumbnail sizes options – ‘thumbnail’ and ‘medium’. These sizes were specified in your WordPress Media settings. The plugin will take the first image, that appears in post body and will display corresponding image thumbnail.
Please note: Plugin doesn’t directly support externally hosted images. You can either use Custom field option. Or you can use Generate Post Thumbnails and Auto Post Thumbnail plugins to create post thumbnails from external images.
If you want to use custom thumbnails sizes and your WordPress is at least 2.9, you can customize your theme according to New in WordPress 2.9: Post Thumbnail Images and use this plugin for automatic assigning thumbnails for existing posts – Generate Post Thumbnails.
Your theme supports post-thumbnails feature. In addition to basic ‘thumbnail’ and ‘medium’ sizes plugin will allow to select post-thumbnails name that is supported by your theme. Plugin will use post thumbnail that was set as thumbnail on Edit Post page. You can set specific post-thumbnail size for related posts and specify it plugin settings. For example:
add_image_size( 'related-post-thumbnails', 100, 100, true ); // thumbnail 100 pixels wide by 100 pixels height, hard crop
Please note, that you need to regenerate thumbnails after Media settings or theme setting were changed. Use this plugin for that – Regenerate Thumbnails or Ajax Thumbnail Rebuild.
Changing thumbnails size
1) * If you use Custom fields to specify your thumbnails plugin interface allows you to specify thumbnails size
2) * If not you can change thumbnails size either by:
– Editing thumbnail size on Media page of your WordPress (and running plugin Regenerate Thumbnails after that)
– Adding new thumbnail size in your theme and selecting it in plugin interface in “Thumbnail size” select box. How to do that read this article New in WordPress 2.9: Post Thumbnail Images. You need to run plugin Regenerate Thumbnails after changing theme options.
Video thumbnails
Please take a look at this plugin, that creates thumbnails from video:
http://sutherlandboswell.com/projects/wordpress-video-thumbnails/
This should solve the problem with displaying images for posts with videos.
DEFAULT IMAGE URL
You can specify URL to default image, that will be used if there is no thumbnail found for the related post.
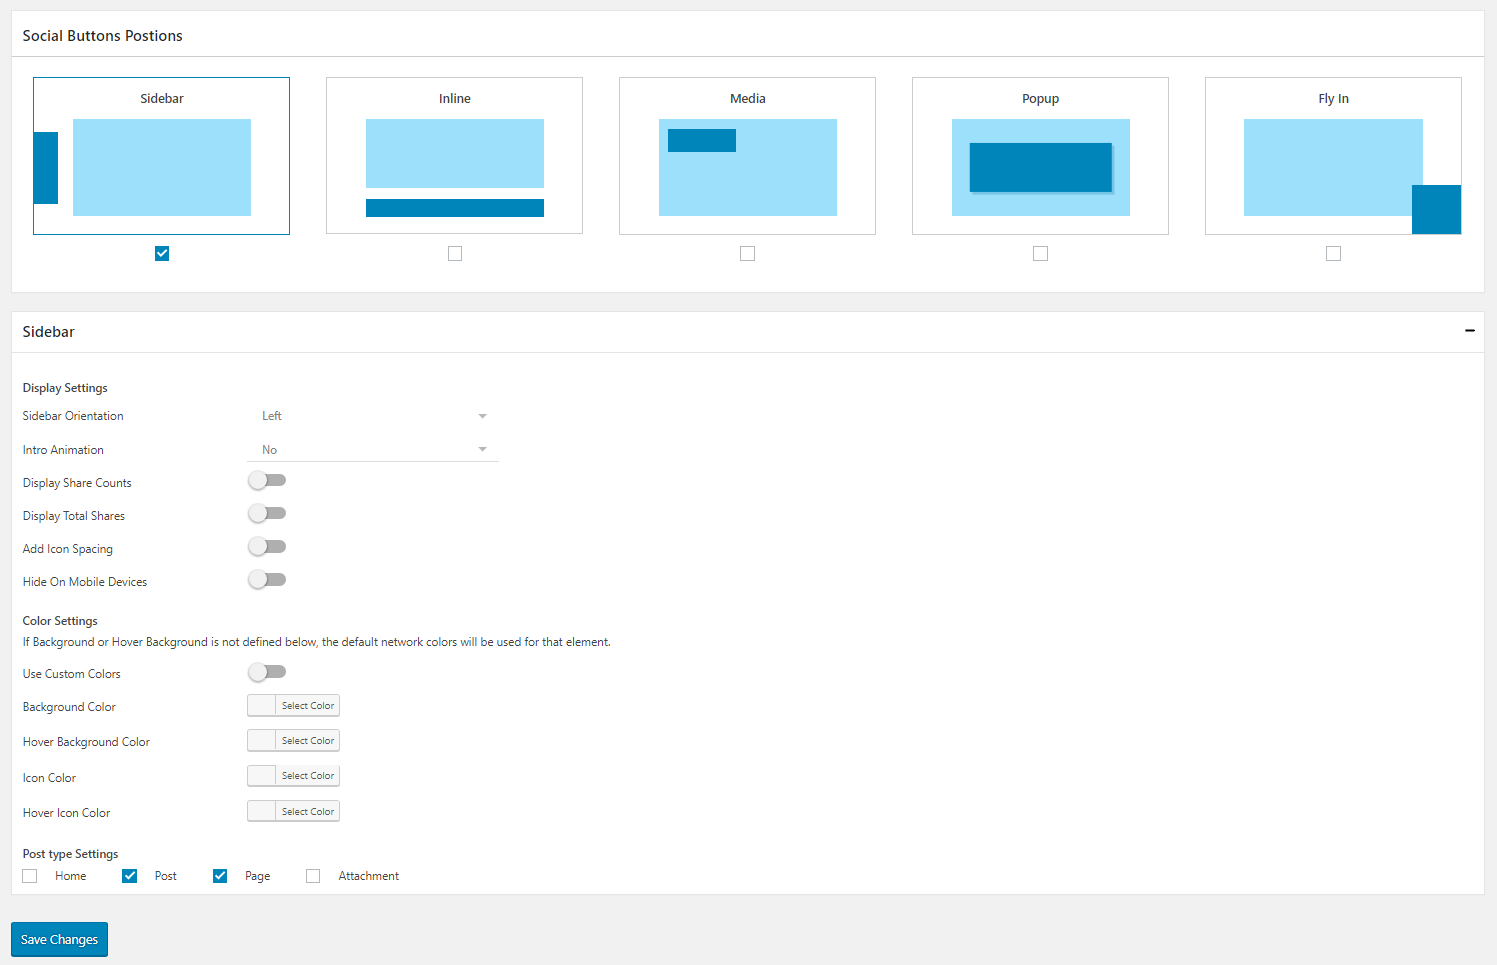
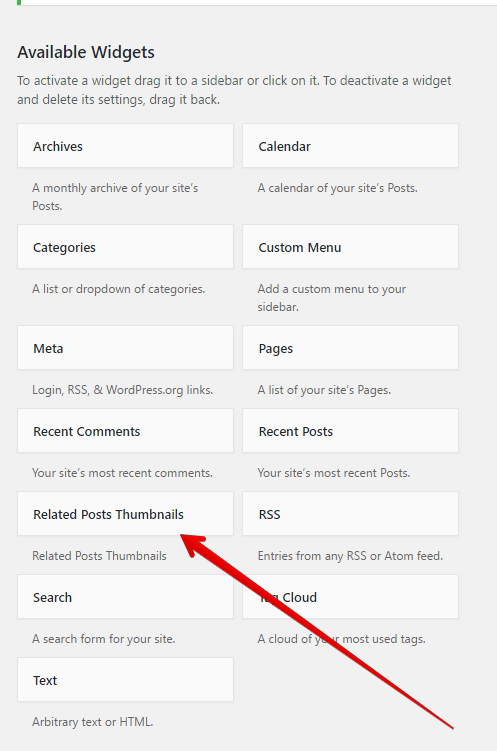
SIDEBAR WIDGET
After the plugin is activated the new sidebar widget becomes available Related Posts Thumbnails on Widgets dashboard. It will be displayed only on single posts pages.
FILTERS FOR RELATED POSTS
Use the filters to change the outcome of Related Posts Thumbnails section.
Related Posts Priority
This filter allows you to change the position of related posts thumbnails on post when there are also other sections available below the post content i.e. social icons or share buttons etc.
function relpost_prioirty_cb( $priority ) {
  $priority = 12;
  return $priority;
}
add_filter(  'rpt_content_prioirty',  'relpost_prioirty_cb' );
Assign $priority variable your desired number. Higher the number, lower the related posts section will appear on posts page below the content.
If you want to make related posts thumbnails appear just below the content, then just make the priority as low as possible.
Thumbnails Alignment
Change the related posts section alignment on post.
function relpost_align_cb( $align ) {
  $align = ' relpost-align-left';
  return $align;
}
add_filter(  'rpt_content_align',  'relpost_align_cb' );
Here are the three possible values that can be assigned to $align variable:
'relpost-align-center'
'relpost-align-right'
'relpost-align-left'
Prevent Related Posts on Editor/Builder
This filter allows to disable related posts on builders edit screen. For now only Divi builder is supported but will add more in near future.
function rpt_prevent_on_edit_cb( $prevent_on_edit ) {
foreach ( $prevent_on_edit as $key => $value ) {
if ( 'divi' == $key ) {
$prevent_on_edit[$key] = true;
return $prevent_on_edit;
}
}
}
add_filter( 'rpt_prevent_on_edit', 'rpt_prevent_on_edit_cb' );
Prevent Image Size Check
When there is no feature image assigned to a post it will pick the thumbnail for related post from inside the post content.
Related Posts Thumbnails plugin will not pick any image form content that is below the WordPress default thumbnail size e.g. 150px width. This filter allows to override that check and picks the first image form post that is even below the default size.
function rpt_prevent_img_size_check_cb() {
  return true;
}
add_filter('rpt_prevent_img_size_check', 'rpt_prevent_img_size_check_cb');
Empty Custom Field
Remove related post if empty custom field data is empty.
function rpt_remove_empty_cfield_cb() {
  return true;
}
add_filter( 'rpt_remove_empty_cfield', 'rpt_remove_empty_cfield_cb');
Change Top Text
This filter is useful when you want to change the heading text of related posts as per your custom condition e.g. change the text as accordance with the current language of site.
Here is an example for the situation described above when using WPML plugin.
function rpt_top_text_cb( $top_text ) {
  if ( defined( 'ICL_LANGUAGE_CODE' ) ) {
    switch ( ICL_LANGUAGE_CODE ) {
      case 'fr':
        $top_text = '<h3> Articles Similaires </h3>';
          break;

      case 'nl':
        $top_text = '<h3> gerelateerde berichten </h3>';
        break;

      default:
        $top_text = '<h3> Related Posts </h3>';
        break;
     }
  }

  return $top_text;
}
add_filter( 'rpt_top_text', 'rpt_top_text_cb' );
Enable Lazy Loading for Related Posts Thumbnails
This filter will help you to load the related post thumbnails images when you scroll down your current blog post to view the related posts.
/**
* Enable Lazy Loading for Related Posts Thumbnails
*
* @return bool
*/
function enable_lazy_loading_thumbnails() {
return true;
}

add_filter( 'rpt-lazy-loading', 'enable_lazy_loading_thumbnails' );
POSSIBLE PROBLEMS AND SOLUTIONS
- Your thumbnails source is “Post thumbnails” and plugin always displays default image instead of thumbnails.
- If your theme supports post-thumbnails, probably your posts do not have assigned thumbnails and on Post Edit page in the block “Featured Image” there is no thumbnail for the post. You can run this plugin – Generate Post Thumbnails – to generate thumbnails for all your posts.
- If your theme does not support post-thumbnails feature, you can see this message “Your theme has to support post-thumbnails to have more choices” on plugin settings page. Posible problem is that at some moment your Media settings were changed but thumbnails were not regenerated. Try using this plugin – Regenerate Thumbnails
- You use “Custom field” as thumbnails source and thumbnails displayed on related posts are not the desired size. You need to specify theme resize URL in plugin settings for correct size display. (read more information here)
- If this doesn’t help please turn on Developer mode in plugin settings and let me know. This will output hidden debugging info in HTML source so I can see what’s going on.
- Plugin does not append thumbnails.
- Try clearing your caching plugin.
- If this doesn’t help, use plugin php tag in your theme <?php get_related_posts_thumbnails(); ?>
- Plugin’s style is conflicting with your theme design. Try different Output styles in plugin settings.
CONFIGURING PLUGIN FOR THESIS THEME
Thesis is a popular theme for WordPress. So if you use it you can follow these directions. In Thesis post thumbnails are usually specified on Post Edit screen in Custom field by providing image URL. So if
configured, you can use the following plugin settings:
- Set “Thumbnails source” as “Custom Field”
- Set “Custom Field Name” as “thesis_post_image”
- Set “Theme resize URL” as “http://YOUR_BLOG_TEMPLATE_URL/lib/scripts/thumb.php”, where YOUR_BLOG_TEMPLATE_URL is your themes folder, and is usually something like http://BLOG_URL/wp-content/themes/thesis_VERSION/lib/scripts/thumb.php, with correct BLOG_URL and VERSION.
Thanx for using “Related Posts Thumbnails”.
Hope you will find this plugin for your theme and don’t forget to add your review after use.