You spent weeks on your pixel-perfect Figma to WordPress workflow, only to find that, ten days into development, the WordPress site looks like a distorted reflection of your mockup.
The spacing is inconsistent, hover states are missing, and the tablet layout is a chaotic mess of overlapping text.
This Figma to WordPress handoff guide covers exactly what to prepare in Figma before handing off to a WordPress dev team, so what gets built matches what you designed.
We will explore in detail the organization of the professional file, responsive breakpoints, component documentation, asset exports, and the specific annotations for the WordPress design system implementation.
Table of Contents
- Why Most Figma to WordPress Handoffs Break Down
- What Designers Get Wrong in Figma to WordPress Handoffs
- How to Organize Your Figma File Before Handoff
- Responsive Design for WordPress: Breakpoints Designers Must Include
- How to Prepare Your Design System for WordPress Development
- Asset Exports: What to Prepare Before Handoff
- Annotations That Prevent Developer Questions
- The Figma to WordPress Handoff Checklist
- The WPBrigade Approach: A Controlled, Professional Handoff Flow
- FAQs
- Conclusion : Prepare Figma Designs For WordPress Devs
Why Most Figma to WordPress Handoffs Break Down
Most Figma handoffs break down as the file looks finished to the designer and incomplete to the developer. When a developer opens a Figma link, they aren’t looking for inspiration; they are looking for instructions.
When those instructions are missing, the project inevitably stalls in a loop of Slack messages and revisions.
Through years of implementing custom builds at WPBrigade, we have identified the five most common failure points that delay launches:
- Unnamed or chaotically named layers: A developer looking at “Frame 47 copy 3” cannot identify what they are building. Without semantic naming, the HTML structure becomes a guessing game.
- Missing responsive frames: A desktop-only design forces the developer to guess how the layout behaves on mobile and tablet. This leads to awkward stacking and unreadable text on smaller screens.
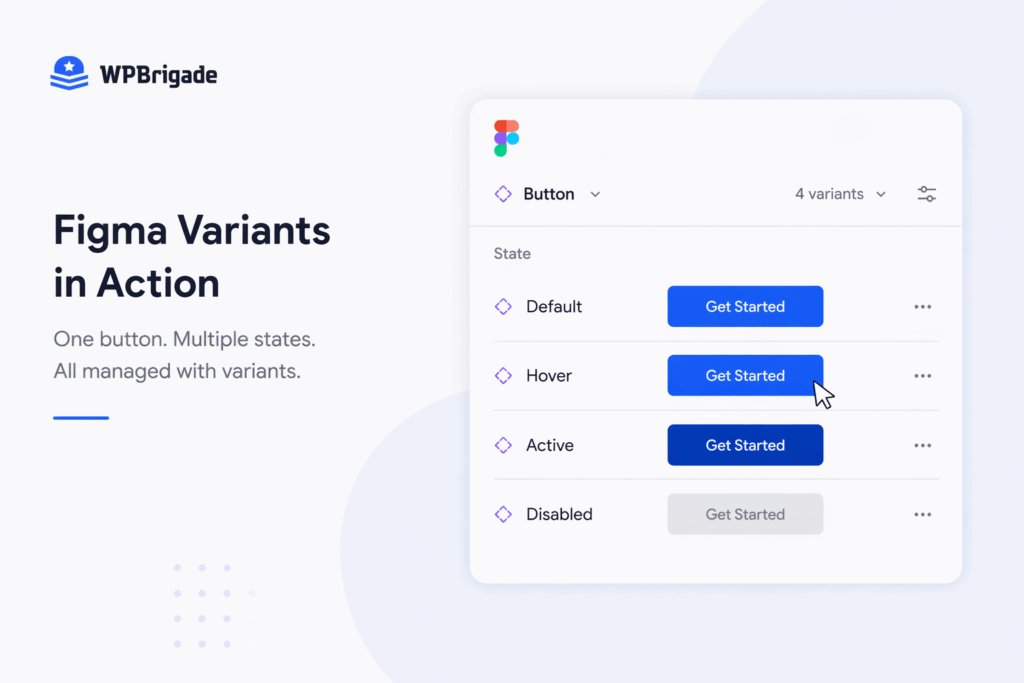
- Undefined interactive states: Buttons that have a default state in the design but no hover, active, or disabled state annotated leave the user experience feeling unfinished and static.
- Unexported or wrongly formatted assets: When SVGs are not marked for export or images are provided in the wrong color profile, the developer must stop coding to fix the assets themselves.
- No CMS zone annotations: The developer does not know which text blocks the client can edit in WordPress. Without these labels, they may hardcode elements that the client needs to update later.
Every one of these is preventable. Here’s how.
What Designers Get Wrong in Figma to WordPress Handoffs
The friction between design and code usually comes from a lack of technical constraints in the Figma file.
A common pitfall is designing outside of a standard 12-column grid system, which forces developers to use custom CSS hacks rather than native WordPress layout tools.
Designers also frequently ignore content length variability, which breaks in WordPress when a client adds longer headlines, extra paragraphs, or uneven content.
Furthermore, using unrealistic typography, such as fonts without web licenses or improper line heights, leads to readability issues post-launch.
One of the most persistent errors is overusing absolute positioning. When you manually place elements rather than using Auto Layout, the developer cannot see the structural relationships between objects.
This creates a layout that looks correct in Figma but breaks when it needs to behave responsively.
How to Organize Your Figma File Before Handoff
To organize your Figma to WordPress handoff guide, you need to provide a technical roadmap for the build.
When a developer opens your file, they should immediately understand the site’s architecture without needing a guided tour.
Here are some ways you can prepare Figma designs for WordPress devs:
- Name Every Layer Descriptively
The “Inspect” panel in Figma is a developer’s primary source of truth. If your layers are named “Rectangle 421” or “Group 7,” the developer has to manually click through the canvas to understand the Figma to WordPress handoff guide.
Every layer, frame, and group must have a descriptive name that mirrors its function. For instance, rename “Rectangle 12” to “Hero Background” and “Group 7” to “Nav Menu Items.”
As a professional standard, use kebab-case or Title Case consistently throughout the file.
If you name a section service-card-wrapper in one frame, do not switch to Service Card Wrapper in the next.
Consistency allows developers to predict the structure and write cleaner, more organized CSS.
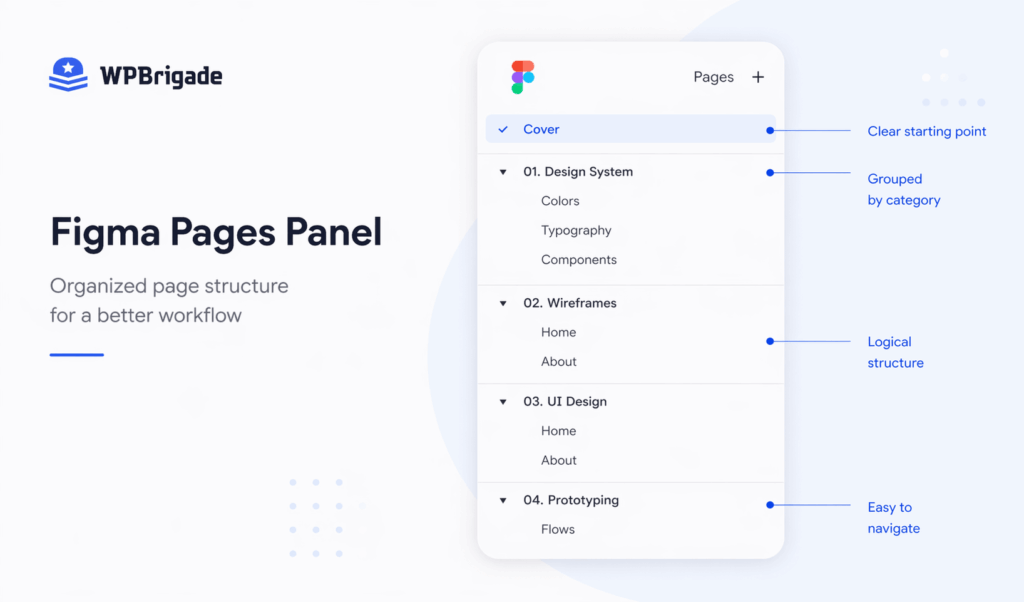
- Organize Pages by Purpose
Dumping every design iteration onto a single page creates a “canvas of chaos.” Instead, use the sidebar to categorize your work by purpose.
A standard professional handoff includes separate pages for the Project Cover, the Design System (styles and tokens), Desktop Designs, Mobile and Tablet Designs, and a dedicated Component Library.
Include a “Handoff Notes” page that serves as a project dashboard. This page should list the project name, current version, date of the last update, and the primary point of contact.
This approach ensures the developer builds reusable blocks rather than duplicating elements across the site.
- Label What Is Ready to Build
Nothing wastes time like a developer building a layout that was actually a discarded concept.
Use Figma’s built-in section status feature to label frames as “Ready for Dev,” “In Review,” or “Do Not Build.”
If you prefer a visual system, place a large, color-coded tag above each frame. Designers need to prepare Figma designs for WordPress devs to know exactly which pixels are approved for implementation and which are still in progress.
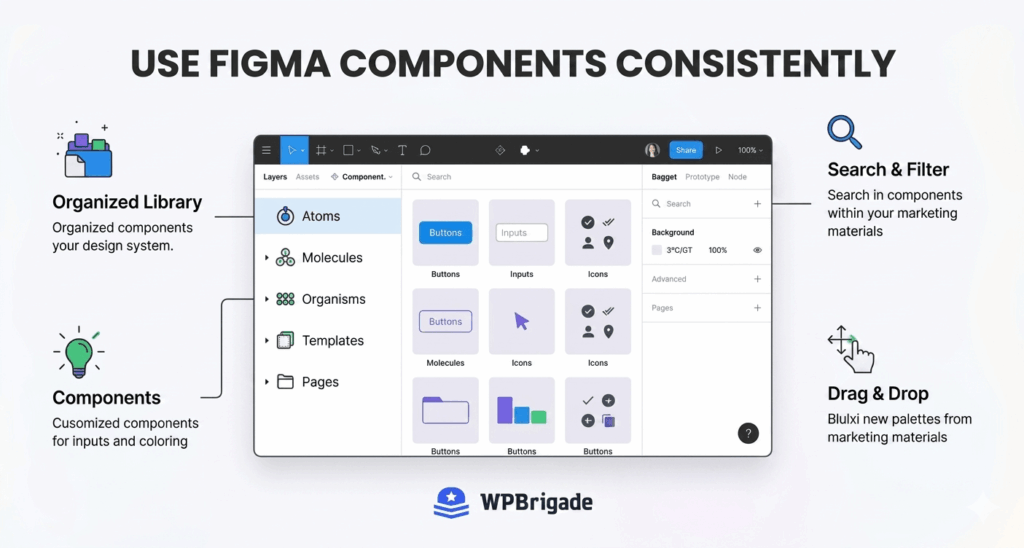
- Use Components Consistently
In WordPress, efficiency comes from reusability. Every repeated element, such as buttons, form fields, and cards, must be a Figma Component rather than a duplicated group.
When you use components, you signal to the developer that this element should be built as a reusable WordPress Block or Template Part.
This approach ensures the developer builds reusable blocks rather than duplicating elements across the site.
Responsive Design for WordPress: Breakpoints Designers Must Include
A desktop frame only tells a developer what the site should look like at one screen width.
WordPress sites are viewed on phones, tablets, and a massive variety of desktop monitors. If you do not define the others, the developer has to guess how your design scales, and that guess will rarely match your original vision.
To ensure your Figma to WordPress handoff guide survives the transition to a live environment, you must provide frames for the industry-standard WordPress breakpoints.
While custom CSS can handle any width, WordPress core, the Block Editor (Gutenberg), and page builders like Elementor rely on specific triggers to shift layouts.
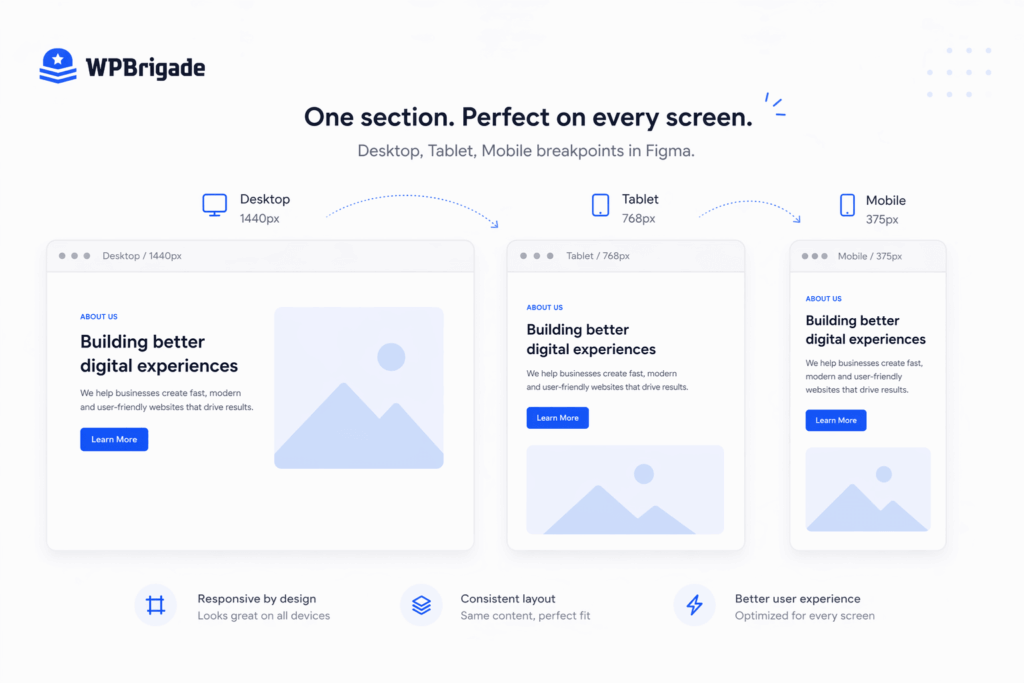
| Breakpoint | Width | Why it matters for WordPress |
| Desktop | 1440px | The standard reference frame. Most WordPress themes use a container width between 1140px and 1320px for content. |
| Tablet | 768px | This is the critical “fold” where Gutenberg and Elementor typically trigger mobile menus and stack columns. |
| Mobile | 375px | Based on the iPhone SE, this reflects a common baseline mobile width used in WordPress testing and analytics. |
For each of these breakpoints, your Figma to WordPress handoff guide must demonstrate a clear strategy. Be explicit about font size changes; a 64px H1 on desktop might need to drop to 32px on mobile to prevent awkward text wrapping.
The key to making this work is Auto Layout. If you use Auto Layout correctly, a developer can simply select an element in Dev Mode and see the exact flexbox properties (Gap, Padding, and Alignment) needed to make the WordPress block responsive.
A frame without Auto Layout is just a visual snapshot; a frame with it is a structural blueprint. One common mistake is treating the mobile frame as an afterthought by simply scaling down desktop elements.
In a professional handoff, the mobile frame must show actual layout decisions, such as which secondary images should be hidden to improve load times and how button touch targets should be increased to improve the mobile UX.
How Page Builders Affect Your Design Decisions
Different builders interpret design files through different technical lenses. If you are designing for the native WordPress Block Editor (Gutenberg), you are working within a more structured, container-based system.
Gutenberg favors “standard” layouts; if your design relies on elements overlapping by random pixel amounts, the developer will struggle to implement it without heavy custom CSS that may break during future WordPress core updates.
On the other hand, page builders like Elementor or Divi offer greater visual freedom, enabling complex absolute positioning and Z-index layering.
However, this freedom comes with the risk of “inconsistent spacing risk.” In Figma, it is easy to drag an element 17px away from another, but in a page builder, developers prefer to work with standardized spacing scales (e.g., 20px, 40px, 80px).
Regardless of the builder, designers must avoid over-nesting. In Figma, it is tempting to wrap frames inside groups, then wrap those groups inside other groups to keep things tidy.
In WordPress, each nested frame adds unnecessary structure in the final build.
Over-nested designs lead to excessive nesting, which bloats the code, slows site load time, and makes it incredibly difficult for developers to manage responsive shifts. Keep your layer hierarchy as flat as possible while still using Auto Layout for structure.
How to Prepare Your Design System for WordPress Development
A design system in Figma is only as good as its implementation in WordPress. Designers often create beautiful libraries that fail during handoff because they are not documented in “dev-speak.”
To bridge this gap, you must translate your visual choices to prepare Figma designs for WordPress devs into a set of technical tokens that a developer can map directly to a theme.json file or a global CSS stylesheet.
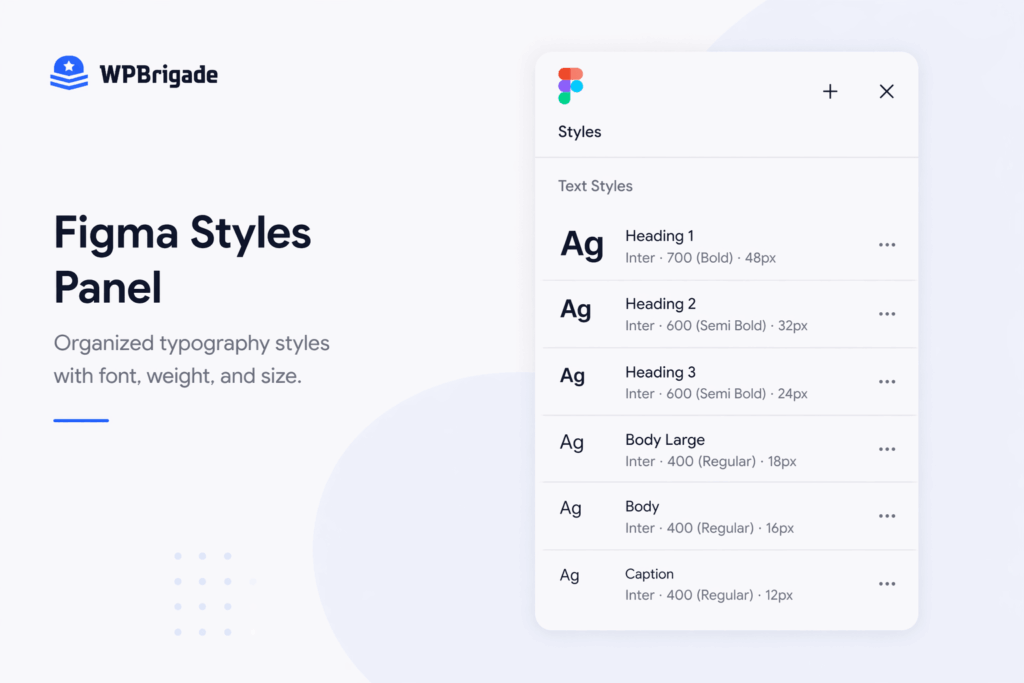
Typography
WordPress renders fonts differently from Figma. To avoid layout shifts or missing characters, you must list every typeface and weight used.
Specify whether the font is available via Google Fonts or Adobe Fonts, or if it requires self-hosting. If you are using a premium font, you must confirm that the client owns a web license and provide the files in WOFF or WOFF2 formats.
A font that looks perfect in Figma may render slightly differently in a browser, so documenting the exact line-height and letter-spacing is essential for a pixel-perfect match.
Colour Tokens
Stop handing off hex codes. Instead, use Figma Styles to create named color tokens like “Primary,” “Action-Success,” or “Neutral-Dark.”
When you name your colors, the developer can translate them into CSS variables or WordPress Global Styles.
This ensures that if the brand’s primary blue changes later, the developer only has to update one variable rather than hunting down every instance of a hex code across the site.
Spacing Scale
A developer cannot guess your spacing logic by clicking on individual frames. If your design follows an 8px grid or a 4px increment system, document it explicitly.
Add a spacing reference frame to your design system page that visually defines your scale.
This allows the developer to set up consistent margins and paddings in the WordPress editor, ensuring the site’s rhythm remains intact across all pages.
Interactive States
In WordPress, a button is not a static object. Every interactive element needs a defined state for Hover, Active, Focus, and Disabled.
Use Figma Variants to group these states together to prepare Figma designs for WordPress devs. Without these definitions, a developer will be forced to choose an arbitrary hover color or transition effect, which often results in an experience that feels disconnected from your original design vision.
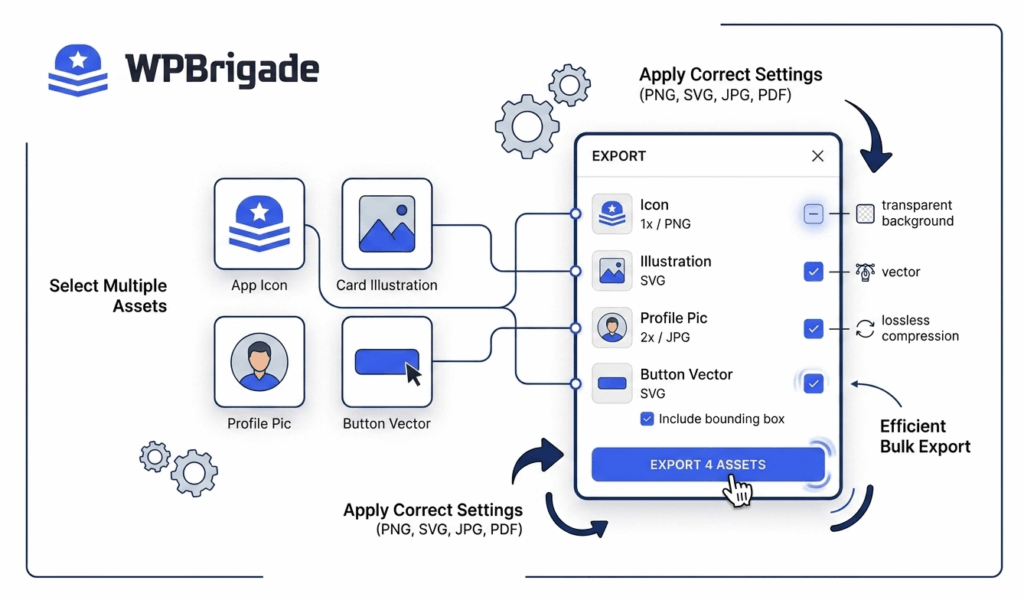
Asset Exports: What to Prepare Before Handoff
Every image, icon, and illustration in the design needs to be exported before handoff. If the developer has to ask for assets, the handoff was not complete.
In the context of how to hand off Figma files to agencies, your asset preparation directly impacts the final site’s Core Web Vitals and overall performance.
To ensure a seamless transition, use this technical format guide for all exports:
| Asset Type | Recommended Format | Why |
| Icons and logos | SVG | Scalable, small file size, and allows for CSS-controllable colors. |
| Photographs | WebP | Provides the best compression-to-quality ratio for WordPress performance. |
| Illustrations | SVG or PNG | Use SVG for vector graphics to maintain crisp lines; use PNG for complex gradients. |
| Backgrounds | WebP (at 2x) | WordPress serves retina displays; 2x resolution ensures backgrounds don’t look blurry. |
| Favicon | PNG (512×512) | The WordPress site icon requires a square PNG at 512px minimum for all device icons. |
Beyond image files, you must handle your typography assets as well. If you are using custom fonts that are not available via Google Fonts, you must include the WOFF and WOFF2 files in your handoff package.
While Figma renders local font files perfectly, a WordPress server needs these specific web formats to display your typography to the public.
Before sharing the link, open the Export panel in Figma, prepare the Figma designs for WordPress devs, then ensure all necessary assets are marked.
A developer should be able to click “Export All” and receive a tidy folder containing everything they need to build the site, without having to hunt through individual layers.
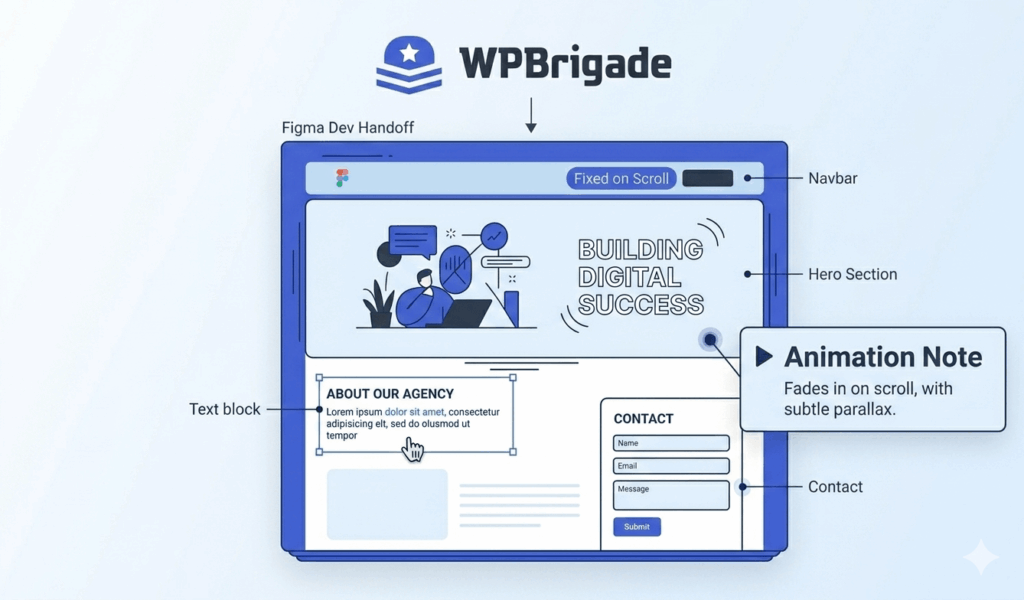
Annotations That Prevent Developer Questions
Annotations turn a visual mockup into a build-ready specification for the design system for WordPress implementation.
In a WordPress environment, these Figma to WordPress best practices make the difference between a site that is easy for a client to manage and one that is frustratingly hardcoded.
- CMS Content Zones
You must explicitly mark which text blocks, images, and background videos should be editable in the WordPress dashboard.
Use a consistent color-coded label, such as “CMS Editable” or “Dynamic Content.” If you leave a section unlabelled, a developer might hardcode the text to save time, forcing you into a revision loop later when the client needs to update their own headlines.
- Animation and Transitions
If a hero section has a scroll-triggered entrance or a button has a specific transition effect, you must provide the specs for it.
A note saying “it fades in” is insufficient. Instead, annotate with specific triggers and durations: “Opacity 0 to 1, 400ms ease-out, triggered on scroll entry (20% viewport).”
- Third-Party Integrations
If a section includes a contact form, a Google Map, or a HubSpot chat widget, annotate it with the specific tool required.
A placeholder that simply says “Contact Form” gives the developer no indication whether they should style a native Gutenberg form or integrate a complex Gravity Forms layout.
The Figma to WordPress Handoff Checklist
In order to learn how to hand off Figma files to agencies, before you share the Figma link with a WordPress development team, confirm that every item below is checked.
This checklist prepares Figma designs for WordPress devs, ensuring that your file is technically sound and ready for a high-performance build.
File Organisation
- Descriptive Naming: All layers, frames, and groups follow a consistent naming convention (e.g., Title Case or kebab-case).
- Page Structure: Pages are separated by purpose (e.g., Design System, Handoff, Components).
- Status Labels: Sections are explicitly marked as “Ready for Dev” or “In Progress.”
- Component Usage: All repeating elements are instances of a Main Component.
Responsive Design
- Core Breakpoints: Desktop (1440px), Tablet (768px), and Mobile (375px) frames are present.
- Auto Layout: Applied to all frames to demonstrate flexbox alignment and spacing.
- Reflow Logic: Layout shifts (stacking vs. hiding) are visually represented for each breakpoint.
Design System and Assets
- Typography: All fonts listed with web licenses and WOFF2 files ready.
- Color Tokens: Colors are defined as Figma Styles, not loose hex codes.
- Interactive States: Hover, Focus, and Active states are defined using Variants.
- Export Settings: All icons are marked for SVG export; images are optimized for WebP.
Annotations
- CMS Zones: Editable text and image blocks are clearly labeled.
- Motion Specs: Animations include trigger, duration, and easing details.
- Third-Party Tools: Forms and widgets are named with specific plugin requirements.
The WPBrigade Approach: A Controlled, Professional Handoff Flow
At WPBrigade, we don’t just convert files; we execute a technical implementation strategy.
While many services rely on automated plugins that produce bloated code, our professional approach is built on manual precision and simplicity.
When you bring a Figma project to our team, we move beyond simple visual replication to ensure your design performs as a high-conversion WordPress asset and how to hand off Figma files to agencies.
Our process begins with a Technical Design Audit. We review your Figma Auto Layouts, variable mappings, and component structures to identify potential development bottlenecks before they arise.
By aligning your design tokens with our custom Gutenberg block patterns or Tailwind-driven CSS, we ensure that the final product is a 1:1 reflection of your mockup, optimized for lightning-fast load times and seamless client editing.
We provide a transparent, milestone-based workflow that keeps designers in the loop:
- Structural Mapping: Translating Figma components into lean, reusable WordPress blocks.
- Dynamic Logic Integration: Building out the CMS editable zones and Advanced Custom Fields (ACF) as specified in your annotations.
- Responsive QA: Rigorous testing across the exact breakpoints defined in your file to ensure fluid behavior on every device.
By choosing WPBrigade as your implementation partner, you gain a team that understands the nuance of a pixel-perfect design and the necessity of a scalable, secure WordPress backend.
We bridge the gap between design vision and technical reality, delivering a site that is as beautiful under the hood as it is on the front end.
FAQs
Conclusion: Prepare Figma Designs For WordPress Devs
A Figma file ready for WordPress handoff is no longer just a visual mockup; it is a technical development specification.
To ensure your next project launches without a hitch, run through the Figma to WordPress best practices checklist, add a dedicated “Handoff Notes page with clear status labels, and verify that all custom fonts are web-licensed.
WPBrigade builds custom WordPress sites from Figma files. If your design is ready for development, our team is ready to build it.
Start a project with WPBrigade
That is all for this post. For more related posts, check:
- Custom WordPress vs No-Code Builders: Which to Choose (2026)
- WordPress Platform Business: 5 Models + Setup Guide (2026)
- How to Optimize WordPress Website Speed (Advanced Guide)
What part of the Figma-to-WordPress handoff design system for WordPress implementation currently causes the most friction for your team? Is it the responsive layouts or keeping the design system in sync?
Leave a Reply