You signed off on a clean brief, then launch day surfaced missing requirements, a redirect map nobody built, and analytics that never fired. A proper wordpress development checklist catches all of that before the first line of code. Most checklists do not.
This article gives you a phase-by-phase wordpress development checklist for custom builds. It covers six phases: Discovery, Architecture, Build, Security and Analytics, QA, and Post-Launch. Each phase includes the 2026-specific requirements that generic checklists skip. This is the checklist WPBrigade applies across every custom WordPress build, from discovery through post-launch.
On This Page
- What Makes a Custom WordPress Build Different from a Standard Launch?
- What 2026-Specific Items Belong in a WordPress Development Checklist?
- What Does the Discovery and Planning Phase Include?
- What Does the Architecture and Technical Setup Phase Include?
- What Does the Build Phase Checklist Include?
- What Does the QA and Pre-Launch Checklist Include?
- Custom WordPress Post-Launch Checklist
- Frequently Asked Questions
- Conclusion
What Makes a Custom WordPress Build Different from a Standard Launch?
A custom WordPress build begins with a formal discovery and requirements phase before any code is written, which distinguishes it from a template-based launch, where development starts immediately. The stakes are different, too. Wrong architectural decisions made in week one cost real money in week six.
A custom WordPress build is a development project in which all site architecture, functionality, and design decisions are made specifically for the client’s business goals, rather than applying a pre-built theme with minor adjustments. Unlike standard WordPress launches, custom builds require a formal discovery phase to establish project requirements, a technical architecture decision (theme approach, plugin stack, hosting environment), and a QA process before launch. The development checklist for a custom build, therefore, begins before the first line of code is written and extends through post-launch monitoring. In 2026, it also includes compliance with Google Consent Mode V2, Full Site Editing architecture decisions, and Core Web Vitals INP targets.
Custom Build vs. Template Launch: Key Differences
A template launch is fast and fine for simple sites. Hosting, install, theme, content, done. A custom build runs through six distinct phases instead, each with defined deliverables.
Skipping discovery is where most projects break. The result? Scope creep, rework, missed integrations, and post-launch SEO damage from late URL changes. Good custom wordpress website planning prevents all four. This is also why a thorough wordpress project requirements checklist sits at the front of any serious build.
| Factor | Template Launch | Custom WordPress Build |
|---|---|---|
| Starting point | Pre-built theme, minor edits | Discovery and requirements brief |
| Timeline | Days to 2 weeks | 4 to 12 weeks (project-dependent) |
| Architecture decisions | Preset by theme | Made in the planning phase |
| 2026 compliance | Often missed or retrofitted | Built into the planning checklist |
| Scalability | Limited by theme constraints | Designed for the client’s growth path |
[SCREENSHOT] A simple project phase diagram showing 6 boxes in sequence: Discovery > Architecture > Build > Security & Analytics > QA > Post-Launch

What 2026-Specific Items Belong in a WordPress Development Checklist?
In 2026, every custom WordPress build checklist must include Full Site Editing architecture decisions, Consent Mode V2 configuration, INP optimization, and PHP 8.2+ server requirements as mandatory items, not optional upgrades. These are the items that separate a current wordpress development checklist in 2026 from a generic launch list. None of them existed in the checklists most agencies still use.
Here is what belongs on the 2026 list and when each decision happens.
2026-Specific WordPress Checklist Items
| 2026 Requirement | What It Means for the Build | When to Decide |
|---|---|---|
| Full Site Editing (FSE) | New theme development now defaults to block themes. WordPress 7.0 (released May 2026) further matures the Site Editor. Decide: FSE or a classic theme with patterns. This affects template structure and client editing. | Discovery phase |
| PHP 8.3 recommended | PHP 8.2 is the safe minimum baseline, though WordPress 7.0 recommends PHP 8.3 or higher (7.4 is the absolute minimum supported). Confirm the hosting environment before writing a line of code. | Architecture phase |
| Google Consent Mode V2 | Required since March 2024 and under active enforcement since July 2025. Sites without it lose attribution and modeled data for users who decline consent. Configure it before analytics goes live. | Security and Analytics phase |
| INP (Core Web Vital) | Interaction to Next Paint replaced FID in March 2024. Target: INP under 200ms. It affects search ranking. Test with the Chrome UX Report and PageSpeed Insights before launch. | QA phase |
| AVIF image format | WordPress has supported AVIF natively since version 6.5, so it is now a stable default. Specify AVIF as the primary image delivery format for better compression and Core Web Vitals. | Build phase |
| WooCommerce Cart/Checkout blocks | For eCommerce builds, block-based Checkout has replaced shortcode checkout as the 2026 standard. Plan for block-compatible payment gateways. | Architecture phase |
Why These 2026 Items Are Non-Negotiable
None of these are nice-to-haves. Consent Mode V2 affects GA4 data quality directly. INP affects search ranking. PHP 8.2 is a security floor, not a preference. Treat each one as a required line item.
Worth noting: Google’s official 2026 AI Search optimization guide (published May 2026 via Search Central) confirms that technical crawlability and unique, expert-led content remain the foundation for visibility in both AI Overviews and traditional search results. You can confirm current version details in the WordPress.org release notes, read Google’s guidance on INP as a Core Web Vital, review the Consent Mode documentation, and the AI features in Google Search guidance directly.
What Does the Discovery and Planning Phase Include?
The discovery and planning phase of a custom WordPress build produces a written project requirements document that defines goals, content structure, functionality, integrations, and success metrics before any design or development begins. Discovery is the phase that the least experienced teams skip. Strong custom wordpress website planning starts here, and a complete following this wordpress development checklist through discovery produces a complete, signed-off project requirements brief.
So, how should agencies plan custom WordPress builds at this stage? They list deliverables, not vague tasks. Work through each item below and capture every answer in writing.
Discovery Phase Checklist Items
- Business goals: Define what outcomes mean success (leads, sales, applications, fewer support tickets). Write them down.
- Target audience: Identify primary users, their devices, and what they need to find fast.
- Content inventory: Map every page, post type, and content structure before design begins.
- Functionality requirements: List every required function: custom post types, user roles, membership, WooCommerce, bookings, multilingual, and search.
- Third-party integrations: Confirm CRM, email marketing, payment gateways, analytics, and booking systems. Check API availability before committing.
- Redirect map (for redesigns): Document existing URLs and their target redirects. Late redirect mapping is a budget and timeline risk.
- Success metrics: Decide how the client will measure success: GA4 key events, conversion rate, Core Web Vitals scores.
- Project constraints: Note budget range, launch date, approval workflows, and legal needs (GDPR, accessibility).
- Reference sites: Collect 3 to 5 sites the client wants to emulate and 3 to 5 they want to avoid. Record why.
- Decision authority: Name who signs off on design, content, and functionality before reviews begin.
The deliverable at phase end is a written project requirements brief that both client and developer sign off on. This document becomes the contract’s technical appendix and the QA baseline. Without it, scope creep is nearly inevitable.
What Does the Architecture and Technical Setup Phase Include?
The architecture phase locks in the technical decisions that are expensive to change later: hosting environment, theme approach (Full Site Editing vs classic), plugin stack, staging setup, and version control workflow. Get these right in week one, and you save weeks of rework. This is the technical checklist for wordpress builds that protects the rest of the project.
Work through each architecture decision before the build begins.
Architecture Phase Checklist Items
- Hosting environment: Choose managed WordPress hosting with PHP 8.2+ and staging support. Confirm it before development starts.
- Theme approach: Decide Full Site Editing (block theme, Site Editor) vs a classic theme with custom block patterns. For new 2026 builds, FSE is the standard default unless the use case requires classic.
- Plugin stack audit: Identify required plugins. Check compatibility, active maintenance, and performance impact. Remove any plugin that duplicates another’s job.
- Staging environment: All development happens on staging. Production stays touch-free until launch day.
- Version control: Set up a Git repository before the first commit. Define the branching workflow (main, develop, feature branches).
- Local development: Standardize the local environment across the team for consistency.
- Database table prefix: Change the default “wp_” prefix to a custom one during initial setup, not after the build.
- Child theme (classic builds only): Create the child theme before any customization if you use a parent theme.
- Staging indexing block: Configure the staging robots.txt to block search engines from indexing the test site.
The deliverable at phase end is a documented technical spec sheet. It confirms hosting details, the theme decision, the plugin list, and the development environment. Share it with the client and the development team before the build starts.
What Does the Build Phase Checklist Include?
The build phase checklist covers theme and plugin implementation, content entry, security hardening, analytics configuration, and login access controls, all completed on staging before any launch activity begins. This is where most checklists live. A real agency wordpress development process treats it as one phase inside a larger lifecycle, not the whole project.
Core Build Tasks
Core build tasks turn the approved design and requirements into a working site on staging. Complete every item below before review.
- Implement the theme (FSE or classic) using the approved design files.
- Build all custom post types, custom fields, and taxonomies from the requirements brief.
- Configure navigation menus, widget areas, and the template hierarchy.
- Upload and optimize all images in AVIF format (native since WordPress 6.5). Set alt text on every image.
- Implement all third-party integrations confirmed in discovery (CRM, payment, forms).
- Set the permalink structure before content entry. Changing it after launch breaks URLs.
- Delete all default WordPress content: the “Hello World” post, the sample page, and the default comment.
- Add a favicon and set the site identity (title, tagline, logo).
Security Setup Checklist
Security configuration belongs in the build phase, not after launch. Hardening the site before staging review closes the gaps that bots exploit on day one.
- Change the default admin username. Never use “admin”.
- Enforce strong passwords on all user accounts.
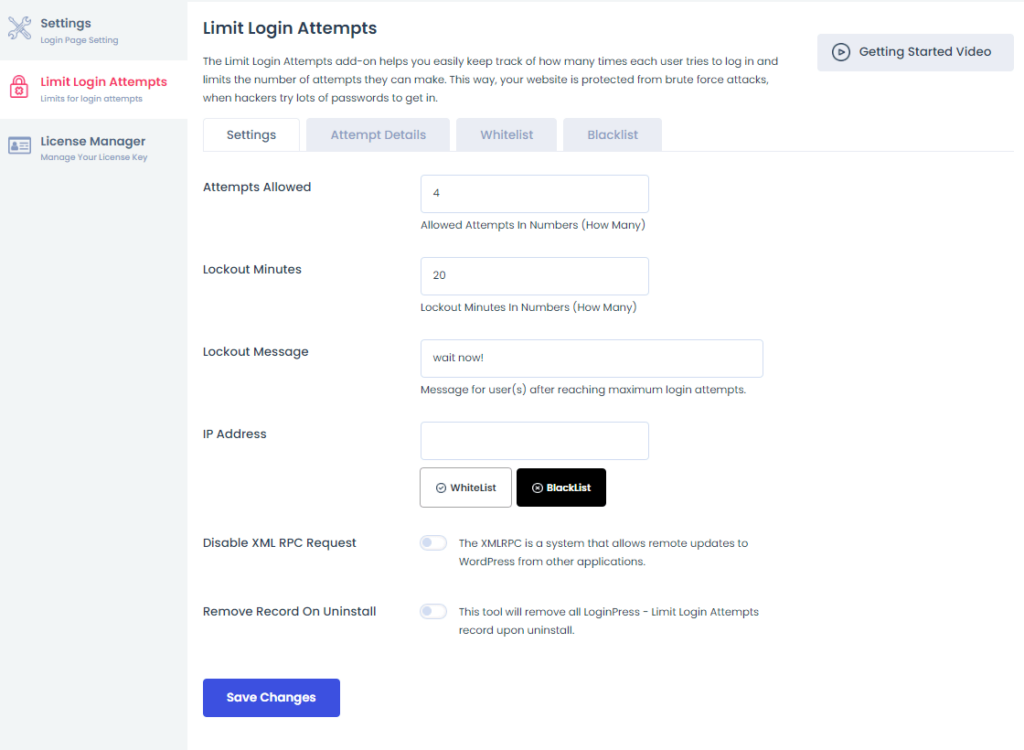
- Configure login attempt limits and lockout duration. LoginPress provides configurable attempt limits, lockout duration, and an admin-unlockable attempt log through its Limit Login Attempts Add-on.
- Customize the WordPress login URL. A non-default URL sharply reduces bot traffic to wp-login.php.
- Install and configure an SSL certificate. Confirm HTTPS is enforced site-wide.
- Set file permissions correctly: wp-config.php to 600, wp-content to 755.
- Delete the wp-config-sample.php file.
- Enable automatic updates for minor WordPress core releases and security patches.
LoginPress is free to install, but the Limit Login Attempts Add-on (attempt caps, lockout duration, and the unlockable attempt log) requires a LoginPress Pro plan. Confirm the plan before you promise the client lockout logging. LoginPress is a WordPress login page customizer with security add-ons, so it handles login design and access control specifically. It is not a full security suite and does not replace a dedicated security plugin.
Analytics and Tracking Setup Checklist
Analytics configuration belongs in the build phase, not after launch. Every item below must be completed and verified on staging before go-live, so tracking works on day one.
- Connect the GA4 property to the WordPress site.
- Configure Google Consent Mode V2. It has been required since March 2024 and enforced since July 2025. Without it, GA4 loses attribution for users who decline consent.
- Set up GA4 key events (form submissions, button clicks, purchases) based on the discovery success metrics.
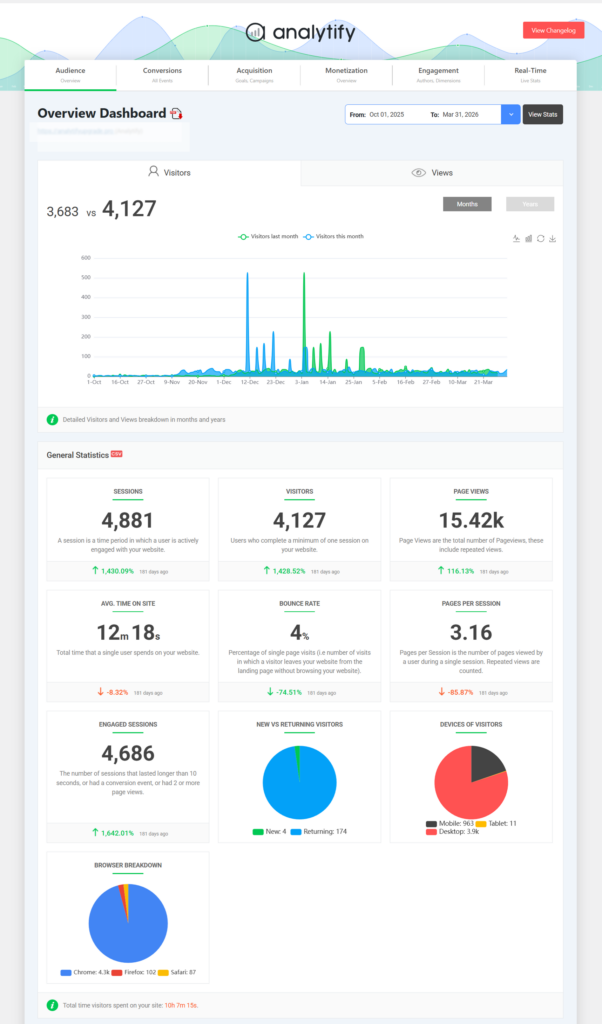
- Install Analytify to surface GA4 data inside the WordPress dashboard. Analytify connects to your GA4 property and displays per-page stats and eCommerce reports inside WordPress, so the client sees data without a GA4 login.
- Verify GA4 events are firing using GA4 DebugView before launch.
- Configure the Search Console property using a domain property (not a URL property) to cover all protocol variants.
The fix for “analytics broke on launch day” is straightforward: verify every event on staging first. Analytify is a GA4 analytics presenter for WordPress. It displays GA4 data directly inside the WordPress admin dashboard. Keep in mind it does not create analytics properties or configure GA4 events — set those up in GA4 before launch.
What Does the QA and Pre-Launch Checklist Include?
The QA checklist for a custom WordPress build includes cross-browser testing, mobile responsiveness, form functionality, Core Web Vitals testing, and a final security scan, all completed on staging before any DNS changes. QA is the gate between staging and live. These items are the minimum standard, and the INP test is the 2026 differentiator.
Run every check below on staging and record the result.
QA and Pre-Launch Checklist Items
- Cross-browser testing: Confirm layout and function on Chrome, Firefox, Safari, and Edge.
- Mobile responsiveness: Test on real devices (iOS Safari, Android Chrome), not just browser simulation.
- Core Web Vitals: Run PageSpeed Insights on all key templates. Targets: LCP under 2.5s, CLS under 0.1, INP under 200ms.
- All forms: Submit each form type. Confirm messages, redirects, and email delivery.
- All links: Run a broken-link scan and fix every 404.
- 404 page: Confirm a custom 404 page exists and links back to the homepage or search.
- Search function: Test that on-site search returns relevant results.
- Search engine indexing: Confirm robots.txt allows indexing and that “discourage search engines” is unchecked.
- SSL enforcement: Confirm all URLs redirect to HTTPS with no mixed-content warnings.
- Analytics verification: Confirm the GA4 real-time report shows active sessions during a staging test.
- Redirect testing: Test every rule from the redirect map documented in discovery.
- Client sign-off: Get written client approval before any DNS changes. Record the timestamp.
Bottom line: nothing on this list is optional, and the client sign-off is the one item that protects you if a dispute comes later.
Custom WordPress Post-Launch Checklist

The post-launch checklist runs within the first 48 hours after go-live and covers DNS propagation verification, Search Console submission, backup configuration, and monitoring setup. Post-launch is where most teams stop engaging. A professional process extends here, and every item below should have a clear owner.
- DNS propagation: Verify the domain resolves correctly from multiple global locations.
- Live Core Web Vitals: Run PageSpeed Insights on the live URL within 24 hours. Field data takes about 28 days to fill in CrUX, but lab data should match staging.
- Search Console: Submit the XML sitemap. Request an index coverage report after 48 hours.
- Backups: Confirm automated offsite backups are running. Test a restore on a staging copy.
- Uptime monitoring: Configure uptime alerting (5-minute interval minimum) to both the developer and the client.
- Analytics live check: Confirm GA4 is receiving real sessions from live URLs, not staging or internal traffic.
- Client training: Document the WordPress admin workflow for the client’s team. Record a screen walkthrough if needed.
- Maintenance agreement: Confirm in writing who owns core, plugin, and theme updates going forward.
The fix for most post-launch surprises is simple: assign an owner to every line before launch day.
Frequently Asked Questions
Conclusion
A custom WordPress build done well is not faster than a template launch; it is more structured. The checklist replaces guesswork at each phase with a defined deliverable, which is why projects that use it have fewer post-launch surprises and lower total cost.
Here is what to do next:
- Save this checklist and adapt the Discovery phase questions into your next client intake form. The requirements brief is the highest-leverage document in any custom build.
- Audit your current build process against the 2026-specific requirements table. If Consent Mode V2, INP, or PHP 8.3 is missing, add it now.
- If your build includes an analytics requirement, Analytify connects GA4 directly to the WordPress dashboard so clients see per-page stats without a separate GA4 login. Add it to the live analytics check-in during your post-launch phase.
Need this whole process handled for you? Explore WPBrigade’s Custom WordPress Development Service.
Further Readings
- How to Plan a WordPress Project (From Brief to Launch)
- WordPress Technical Audits: What Agencies Look for Before Scaling
- How to Choose the Right WordPress Plugins Without Hurting Performance
Key Takeaways
- A thorough wordpress development checklist prevents common pitfalls like missed requirements and scope creep during custom builds.
- The checklist organizes the development process into six phases: Discovery, Architecture, Build, Security and Analytics, QA, and Post-Launch.
- Each phase includes critical 2026-specific requirements, like Consent Mode V2 and Full Site Editing architecture decisions.
- Skipping the discovery phase can lead to costly mistakes, making a detailed project requirements brief essential.
- Post-launch, the checklist ensures ongoing monitoring and maintenance, reducing surprises and improving project outcomes.
Leave a Reply