
You updated your WordPress site, refreshed the page, and nothing changed. That happens because an old, cached version is still being served, and the fix is usually clearing four cache layers in the correct order: plugin, hosting, browser, and CDN.
This guide shows you exactly how to clear cache in WordPress using these four methods, in the right order, so you see your changes live within a short time.
You’ll learn how to clear cache from WordPress using four methods, including hosting cache, browser cache, and CDN cache, based on WPBrigade’s agency experience managing cache issues across hundreds of client sites.
How to Clear Cache From WordPress (TOC):
What Is Cache in WordPress and Why Does It Need to Be Cleared?
Cache improves speed by serving a saved copy instead of rebuilding the page each time. It needs to be cleared in WordPress whenever you make a change that visitors should see immediately, such as publishing a post, updating prices, modifying a menu, or changing your design, because the cached version of the page still shows the old content until the cache is refreshed.
This is why clearing cache in WordPress is one of the first troubleshooting steps for “my changes aren’t showing” problems.
Cache exists in four layers, and each one stores something different. A page might be cached at the plugin level, the hosting level, the browser level, or the CDN level, sometimes all four at once.
That’s why clearing cache in WordPress can require more than one step.
Cache improves speed, and if your problem is outdated content, clearing the cache solves that directly.
Clearing cache is always safe. It does not delete your posts, pages, images, or settings. It only removes temporary stored copies, forcing your site to generate fresh versions. Your content stays exactly as you saved it.
| Cache Type | What It Stores | Where It Lives | When to Clear |
| Plugin cache | Static HTML versions of pages | WordPress server | After publishing, design changes, plugin/theme updates |
| Hosting cache | Server-level page copies | Your hosting provider’s servers | After clearing plugin cache if changes still don’t appear |
| Browser cache | Images, CSS, JS files | Visitor’s device (and yours) | When you can’t see your own changes after clearing plugin + host cache |
| CDN cache | Static assets on global servers | Cloudflare, BunnyCDN, etc. | When visitors in other regions can’t see your updates |
How Do You Clear Cache in WordPress? The Right Order to Try
Clear your WordPress cache in this order: plugin cache first, hosting cache if changes still don’t appear, browser cache for changes only you can’t see, and CDN cache if visitors in specific regions are seeing old content.
Working through the layers in sequence saves you time and rules out the real cause fast.
Here’s how to work through each layer, in order:
Method 1: How Do You Clear Cache Using a WordPress Cache Plugin?
Most WordPress sites use a caching plugin, and clearing cache here is always the first step because it controls the largest cache layer. A plugin generates static HTML versions of your pages, so WordPress doesn’t rebuild them on every visit. When you publish or edit content, this static version can still be served unless you manually clear it.
The two most common cache plugins are WP Rocket and W3 Total Cache. Both live in your WordPress admin bar, and both take under a minute to clear.

Important: If you’re on managed WordPress hosting, your host may run its own caching layer alongside or instead of a plugin. If clearing your plugin cache doesn’t resolve the issue, try clearing it through your hosting provider
Clearing cache with WP Rocket:
- Log in to your WordPress admin dashboard.
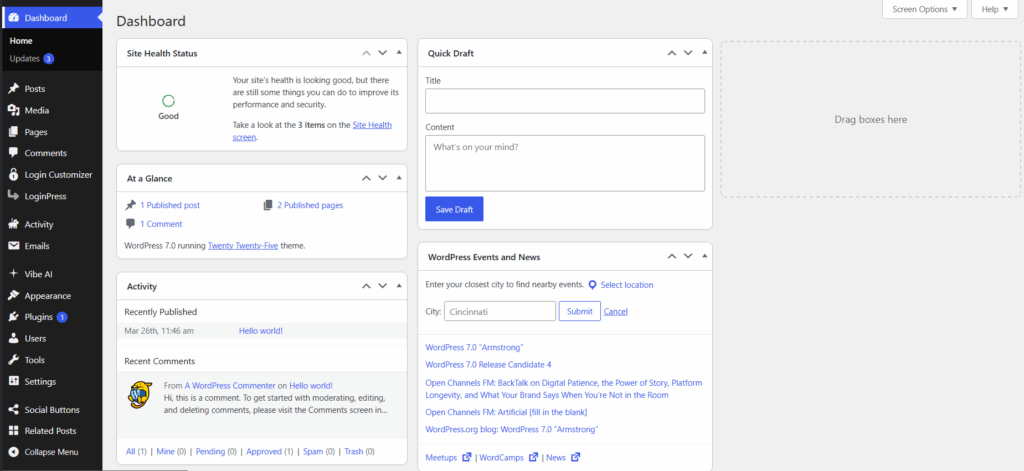
- Look for the WP Rocket icon and click on it to access the main dashboard and other settings.
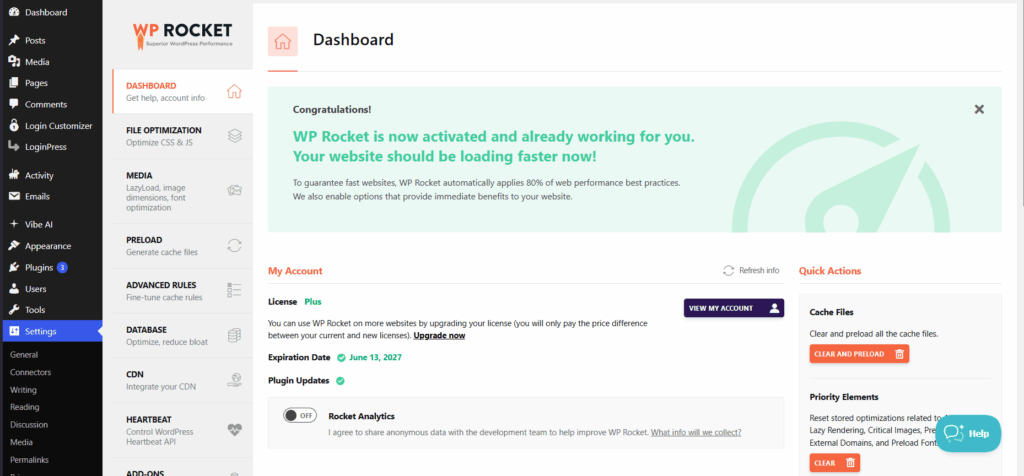
- Click the icon, then select the Clear and Preload option from the quick menu.
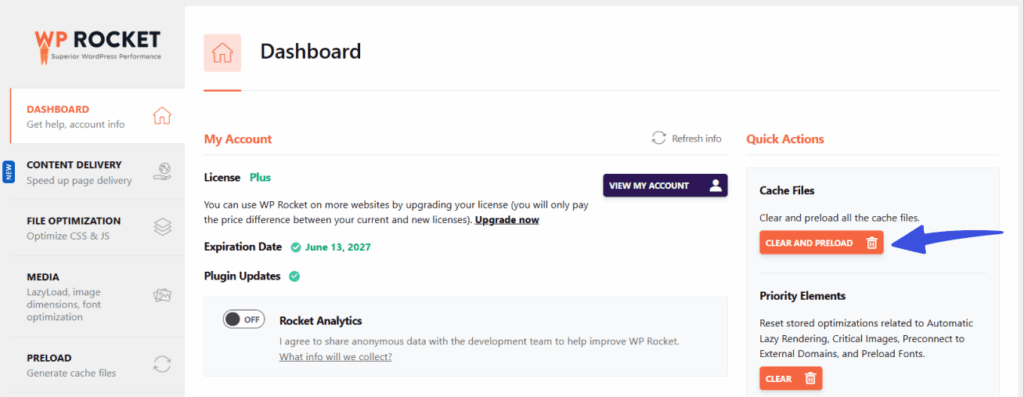
- Wait for the confirmation message to appear.
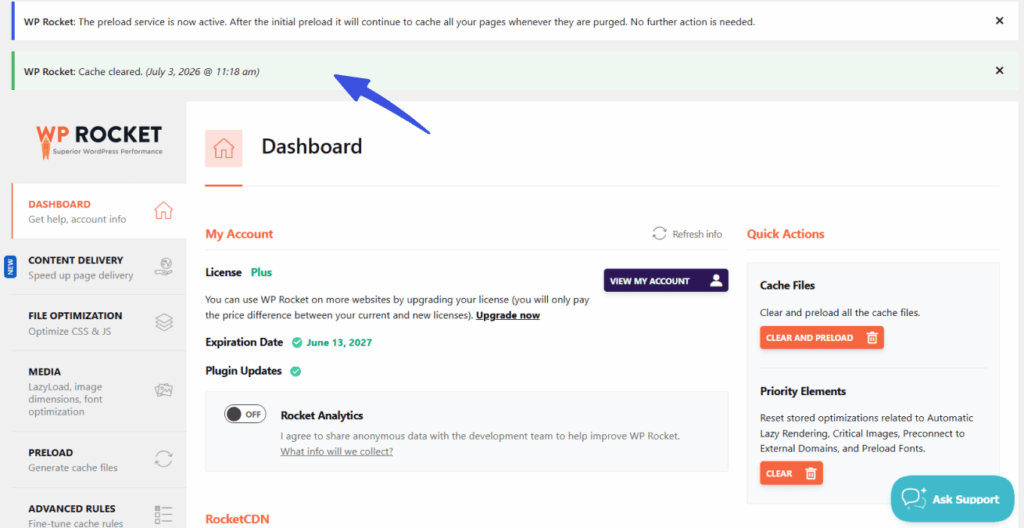
You’ll see a confirmation notice once the plugin cache is cleared.
Clearing cache with W3 Total Cache:
- Look for “Performance” in the WordPress admin bar.
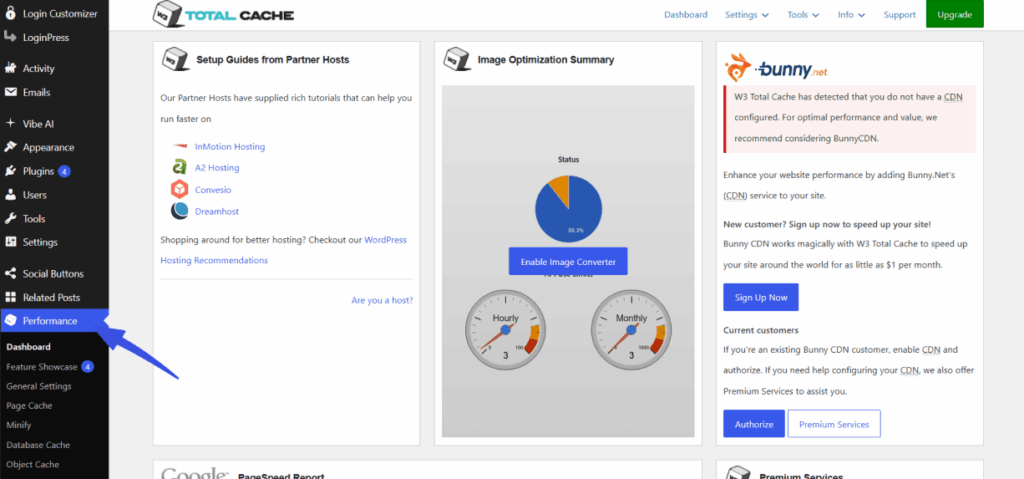
- Hover over it, then select Purge All Caches.
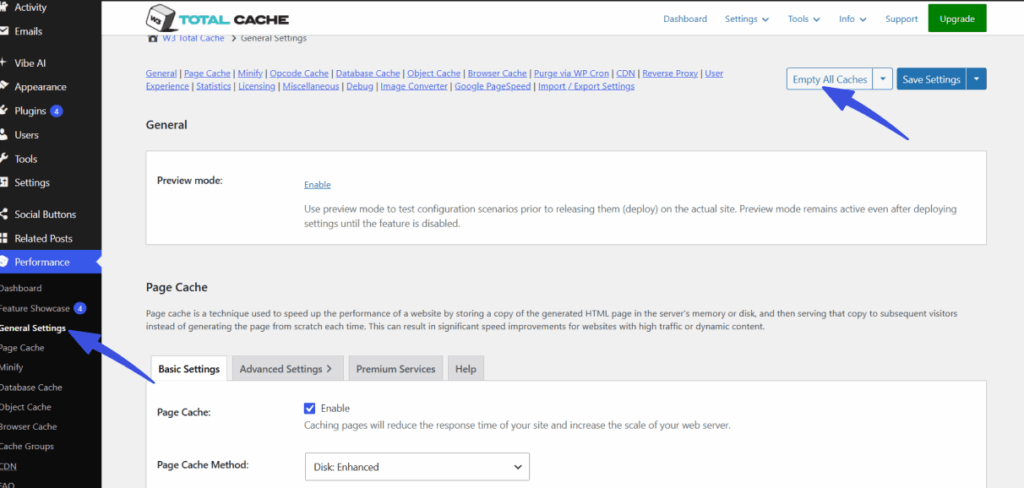
- Wait for the page to reload, then check your front end.
Note: The admin bar link is labeled Performance, not W3 Total Cache, so look for that word specifically.
Method 2: How Do You Clear Cache from Your Hosting Dashboard?
If your changes still aren’t visible after clearing your plugin cache, your hosting provider’s server-level cache is likely still serving the old version. This is the most missed step.
Hosting cache sits above your plugin cache and can override it, so a plugin-level clear alone won’t always fix the problem.
In our experience managing sites, the hosting cache is the most frequently overlooked layer. Clients often tell us they cleared the cache, but nothing changed, and it’s almost always the host-level cache still serving stale content.
Note: For all other hosts, log in to your cPanel or hosting dashboard, look for a “Performance,” “Speed,” or “Caching” section, then click “Purge” or “Clear Cache.”
Method 3: How Do You Clear Your Browser Cache in WordPress?
Clear your browser cache when you can see the changes yourself after clearing plugin and hosting cache, but a specific visitor or a client still sees the old version.
Start with a hard refresh. It’s faster than a full cache clear, and most readers only need this step.
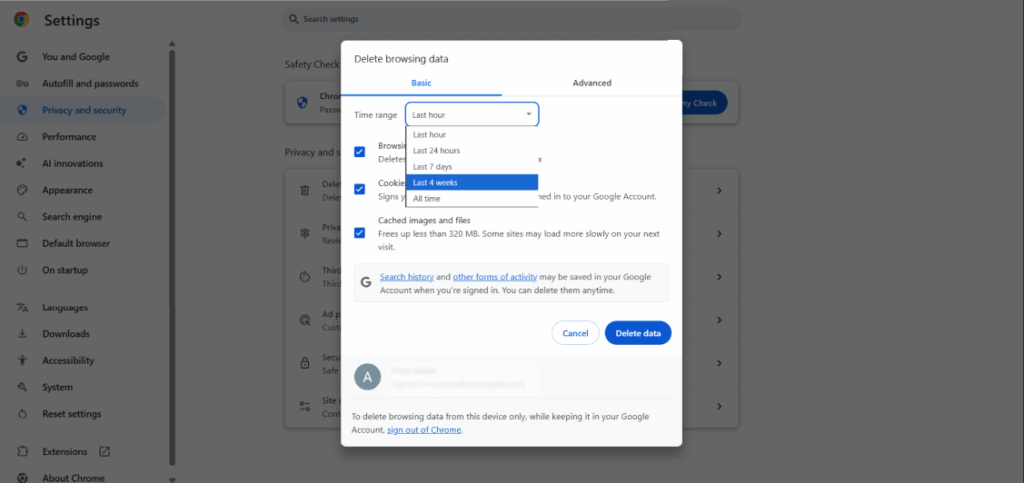
| Browser | Hard Refresh | Full Cache Clear |
| Chrome | Ctrl+F5 (Windows) / Cmd+Shift+R (Mac) | Menu >> Settings >> Privacy >> Clear browsing data >> Cached images and files |
| Firefox | Ctrl+Shift+R (Windows) / Cmd+Shift+R (Mac) | Menu >> Settings >> Privacy >> Clear Data >> Cached Web Content |
| Safari | Cmd+Option+R | Safari >> Preferences >> Privacy >> Manage Website Data >> Remove All |
| Edge | Ctrl+F5 (Windows) | Menu >> Settings >> Privacy >> Clear browsing data >> Cached images and files |
If a hard refresh doesn’t work, run the full cache clear for your browser. These wipes store images, CSS, and JS files completely, forcing a fresh download on your next visit.
Method 4: How Do You Clear CDN Cache in WordPress?
Clear your CDN cache when visitors in specific locations or on specific networks still see old content after you’ve cleared plugin, hosting, and browser cache. This is the most advanced method and the least common trigger, since it only affects sites using a CDN like Cloudflare.
Clearing Cloudflare cache:
- Log in to your Cloudflare account at dash.cloudflare.com.
- Select your domain from the account list.
- Go to Caching >> Configuration.
- Click Purge Everything, then confirm when prompted.
Note: If you use a different CDN, look for a Purge Cache or Clear Cache option in your dashboard caching settings; the steps follow the same basic pattern.
What Are the Best Practices for Clearing Cache Without Breaking Your Site?
The safest practice for clearing WordPress cache is to clear one layer at a time, check your site after each step, and never run two caching plugins simultaneously, which is the most common cause of cache that appears impossible to clear.
In my own experience while testing cache plugins in my local environment, this exact scenario shows constantly: I have often installed a second caching plugin “just to test it,” forgetting to deactivate the first, and end up with two systems fighting over the same cached files.
No amount of clicking “clear cache” fixes that, because the real problem isn’t the cache; it’s the conflict.
To avoid this and similar issues, follow these best practices when clearing cache in WordPress:
- Clear cache in sequence: plugin first, host second, browser third, CDN last.
- Never run two caching plugins at the same time.
- Take a backup before making major changes that require a cache to be cleared.
- Use incognito mode to verify changes after clearing the cache.
- Check your site’s front end from a different device or network after clearing.
- Enable automatic cache clearing on post publish if your plugin supports it.
- Set cache expiry to a reasonable interval such as 24-48 hours for most sites, shorter for ecommerce.
- Contact your host if server-level cache persists after multiple purges.
If cache clearing consistently fails to work, the problem is usually a configuration issue and not a cache issue. WPBrigade’s WordPress optimization team regularly audits client sites for exactly these conflicts.
How Does Clearing Cache Affect WordPress Performance and SEO?
Clearing cache temporarily slows your site for the first visitor after a purge because WordPress must rebuild and re-cache each page from scratch, but this is short-lived and has no lasting negative SEO impact.
Once that first page load regenerates the cached version, subsequent visitors get the fast, cached experience again.
Premium plugins like WP Rocket reduce or eliminate this dip entirely through cache preloading, which automatically re-caches key pages immediately after a purge instead of waiting for a real visitor to trigger it.
Where cache actually hurts, SEO isn’t clearing; it’s not clearing it when needed. Outdated cached files can serve old CSS or JavaScript after a design change, causing visible layout to shift as the page reflows.
That matters because Google uses Core Web Vitals, including Largest Contentful Paint (LCP), as ranking signals.
A site stuck serving stale, unoptimized cache can quietly degrade both Cumulative Layout Shift and LCP scores over time.
Clear cache when your site changes, expect a brief rebuild delay, and don’t worry about it affecting rankings.
FAQs
Conclusion
Cache keeps WordPress sites fast, but it can also cause them to show old versions of your content after updates. Clear it in sequence: plugin first, host second, browser third, CDN last, and you’ll resolve the majority of “changes not showing” problems in under five minutes.
Next steps:
- Clear your caching plugin cache using the admin bar shortcut for the plugin you have installed.
- If changes still don’t appear, log into your hosting dashboard and purge the server-level cache.
- Verify the fix in an incognito browser tab or on a different device before telling clients or stakeholders their update is live.
If caching conflicts are causing recurring issues on your site, and you need help setting up caching correctly? Talk to the WPBrigade Team
Check out more guides on cache and website optimization here:
- Is WP Rocket Still the Best WordPress Cache Plugin?
- How to Optimize WordPress Website Speed (Advanced Guide)
Which layer of cache trips you up the most — plugin, hosting, browser, or CDN? Let us know in the comments below!
Leave a Reply