
Most guides about migrating from WooCommerce to Shopify are too generic. Migration app vendors say it takes one click. Theme marketplaces say it’s a weekend job. Then launch day arrives, and your rankings, customer accounts, and order history are gone.
I’ve handled enough of these migrations at WPBrigade to give you the version with nothing skipped: you’ll export your products, customers, and orders, rebuild your theme in Shopify’s Liquid system, set up 301 redirects for every URL, and send a password reset to every customer.
This guide gives you the complete migration roadmap, including the five things that don’t transfer automatically. Most launch-day problems trace straight back to that list.
You’ll get the migration methods, a pre-migration checklist, step-by-step data migration, SEO preservation steps, and a straight answer on when to bring in a professional team.
Table of Contents
- What Are the Ways to Migrate from WooCommerce to Shopify?
- What Doesn’t Transfer Automatically When You Migrate to Shopify?
- What Should You Do Before Starting the Migration?
- How Do You Migrate Products and Collections to Shopify?
- How Do You Migrate Customers and Orders to Shopify?
- How Do You Preserve SEO When Migrating from WooCommerce to Shopify?
- How Long Does a WooCommerce to Shopify Migration Take?
- When Should You Hire an Agency to Handle the Migration?
- FAQs
- Final Thoughts
What Are the Ways to Migrate from WooCommerce to Shopify?
There are three main paths for a WooCommerce to Shopify migration: manual CSV export and import, a dedicated migration app, and a managed agency migration. Each one fits a different store size and risk tolerance, and all three can migrate products and customers to Shopify.
Manual CSV migration is free but error-prone. It works best for small catalogs. In comparison, a migration app moves faster and handles more data types, including orders and customers. An agency migration offers the highest accuracy, and it covers SEO, theme rebuilding, and third-party integrations in one pass.
| Method | Best For | What It Handles | Risk Level |
| Manual CSV | Stores under 500 products | Products, basic customer data | High: manual errors are common |
| Migration App | Mid-size stores, faster timelines | Products, customers, orders | Medium: depends on data complexity |
| Agency Migration | 500+ products, high traffic, custom features | Data, theme, SEO, integrations | Low: handled by specialists |

WPBrigade Insight: In our experience, stores with custom product fields, subscriptions, multilingual content, or ERP integrations rarely migrate cleanly through CSV files alone. Planning these requirements before migration prevents costly fixes after launch.
If you’re still weighing whether to switch at all, see WPBrigade’s Shopify vs WordPress platform comparison first. Shopify’s own official migration documentation covers all supported import options if you want to compare methods directly.
What Doesn’t Transfer Automatically When You Migrate to Shopify?
Five important store components do not migrate automatically from WooCommerce to Shopify: your theme, customer passwords, product reviews, custom plugin functionality, and URL structure. These require manual work or custom development during migration.
| Data / Asset Type | Transfers? | Action Required |
| Products | Yes | Formatting cleanup after import |
| Customer records | Yes | Verify field mapping |
| Customer passwords | No | Send a password reset email |
| Orders | Yes, with a tool | Native CSV import has limits |
| Theme/store design | No | Rebuild in Shopify’s Liquid system |
| Product reviews | No | Requires a Shopify app |
| Custom plugin functionality | No | Find Shopify app equivalents or rebuild |
| Blog posts | Partial | Content moves, URLs change |
Worth noting: three of these items cause the most damage if you miss them.
WooCommerce and Shopify use incompatible password encryption. As a result, every customer must reset their password on first login. Send a bulk password reset email the day you launch.
WooCommerce themes are built for WordPress using PHP, while Shopify themes use the Liquid templating language. Because the platforms use different architectures, your existing design cannot simply be imported. Instead, it must be recreated or rebuilt using a Shopify-compatible theme.
WooCommerce product URLs use the /product/item-name/ format. Shopify uses /products/item-name/ instead. Every product, collection, and blog URL changes, which makes 301 redirects mandatory.
If you need a custom Shopify theme built during your migration, WPBrigade’s Shopify development team handles this as part of a managed migration.
What Should You Do Before Starting the Migration?
Before touching a single export file, complete four pre-migration phases: back up and document your store, record your SEO and analytics baseline, set up your Shopify foundation, and plan the cutover. Work through this Shopify migration checklist to close every gap before migration day.
Phase 1: Back up and document your store
- Back up your WordPress and WooCommerce database and files using a backup plugin or your hosting control panel.
- Export and document every custom plugin function so you can find Shopify app equivalents.
- Document all internal links between your pages, products, and posts.
- List every third-party integration: payment gateways, shipping tools, ERP, accounting, email platforms.
Phase 2: Record your SEO and analytics baseline
- Crawl your site with a tool like Screaming Frog or Ahrefs and export every indexed URL into a spreadsheet. You’ll use this for your 301 redirect map.
- Screenshot your Google Search Console data: current keywords, impressions, and clicks. This becomes your benchmark for post-migration monitoring.
- Export all SEO metadata: meta titles, meta descriptions, and image alt text.
- Verify that Google Analytics 4 is collecting data correctly, and record your current conversion rate and revenue.
Phase 3: Set up your Shopify foundation
- Create a Shopify account and choose your plan. Shopify’s free trial runs for 3 days, so commit to a paid plan quickly if you’re serious about the timeline.
- Decide on your Shopify theme before you start. Theme choice affects how images, collections, and navigation get structured later.
Phase 4: Plan the cutover
- Meanwhile, keep your WooCommerce store live throughout the migration. Don’t take it down until the Shopify store is tested and DNS is ready to cut over.
- Notify your team of the migration timeline and the expected downtime window for DNS cutover, typically 15 to 60 minutes.
- Freeze catalog changes before migration day.
Pro Tip: Freeze product updates 24 to 48 hours before the final migration to avoid missing inventory or order changes during the cutover.
How Do You Migrate Products and Collections to Shopify?
Products can be migrated to Shopify through a CSV export from WooCommerce, Shopify’s built-in Store Importer app, or a third-party migration tool. The CSV method needs manual column formatting to match Shopify’s schema.
Step-by-Step Product Migration
Step 1: Go to WooCommerce, then Products, then Export. Select “All products” and download the file as a CSV.
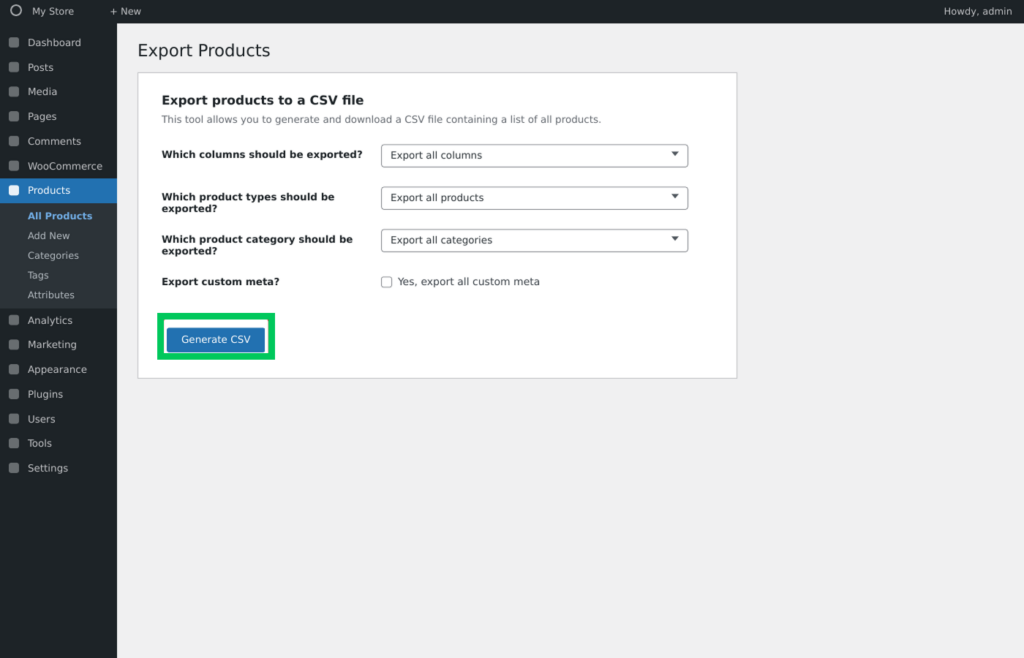
Step 2: Open the CSV and review it for formatting issues. Check for long HTML-heavy descriptions, inconsistent SKUs, and missing image URLs. Clean the data before you import it.
Step 3: Sign in to Shopify Admin, then go to Products, then Import. Upload your cleaned CSV file.
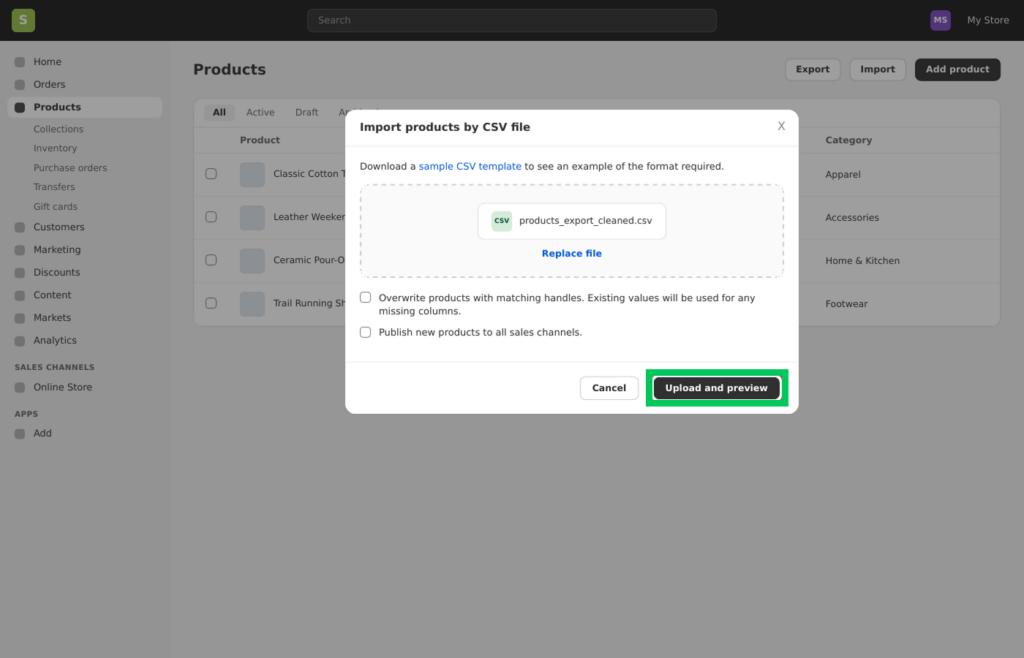
Step 4: Review Shopify’s import preview carefully. Confirm titles, descriptions, prices, SKUs, variants, inventory quantities, product images, and product status are all mapped correctly before completing the import.
Step 5: After the import finishes, manually check 10 to 20 products across different categories. Confirm images load, descriptions display properly, and variants function as expected.
Step 6: Create or review your Collections, which are Shopify’s equivalent of WooCommerce categories. Map each WooCommerce product category to a Shopify collection.
Bottom line: for stores with more than 1,000 products, a migration app handles column mapping more reliably than a manual CSV. Formatting errors in large files are common and slow to fix by hand.
How Do You Migrate Customers and Orders to Shopify?
Customer records, including names, emails, addresses, and purchase history, can be migrated to Shopify through CSV. Customer passwords cannot transfer because WooCommerce and Shopify use incompatible encryption, so every customer needs to reset their password on first login.
Migrating Customers
- Export customers from WooCommerce, either through the Customers screen or a dedicated export plugin.
- Next, format the CSV to match Shopify’s customer template. Name, email, phone, and address fields map differently between the two platforms.
- Import the file in Shopify Admin, under Customers, then Import.
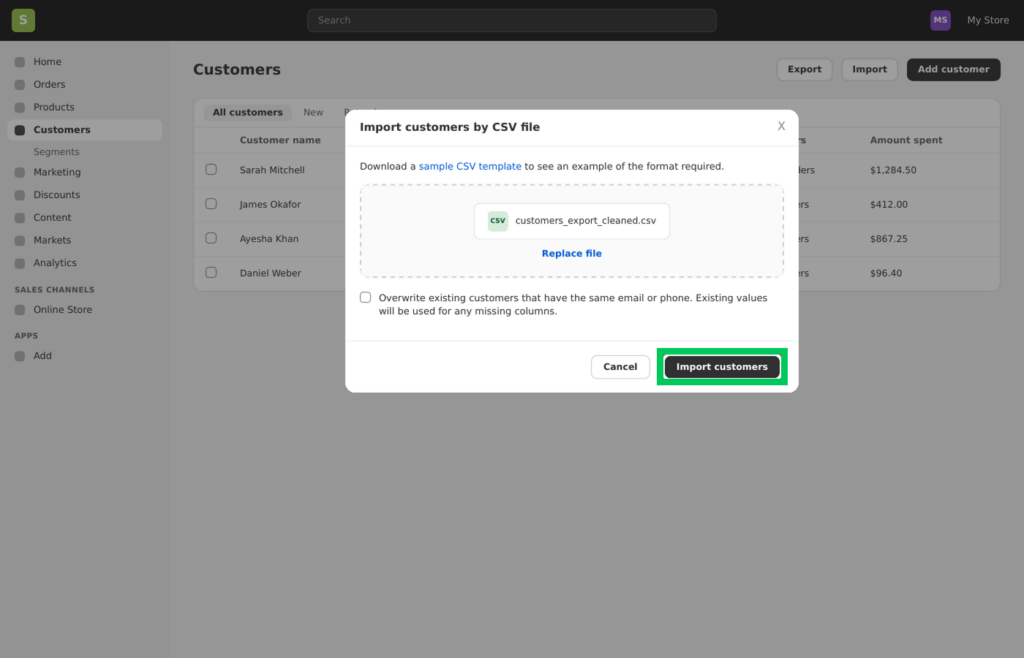
- Immediately after the import, send a bulk password reset email to every customer. This has to happen before launch, not after.
Migrating Orders
Shopify’s native CSV import doesn’t handle order history. Instead, you need a migration app or a manual API import to migrate orders.
For most merchants, migrating the last 1 to 2 years of order history is enough. Moreover, older orders often aren’t worth the migration effort.
Afterward, verify that order statuses, line items, and payment records transferred correctly. DIY order migration frequently runs into trouble on larger stores, so don’t promise a customer or a client that every order will transfer perfectly through CSV alone.
How Do You Preserve SEO When Migrating from WooCommerce to Shopify?
Stores that skip 301 redirects during a WooCommerce to Shopify migration can lose a large share of their organic traffic, often permanently. Every URL changes between the two platforms, and Google’s site-move documentation confirms that redirects are how ranking signals transfer to your new pages. Without them, search engines treat your new URLs as brand-new pages with no history.
Here’s why that matters: rankings built over years can disappear within weeks if redirects are missing or misconfigured.
- Build a URL mapping spreadsheet before you migrate. List every old WooCommerce URL in one column and its new Shopify URL in the next. Cover every product, collection, blog post, and static page.
- Set up 301 redirects in Shopify Admin, under Navigation, then URL Redirects. Upload your mapping spreadsheet directly.
- Verify redirects manually. For example, enter 10 to 15 old WooCommerce URLs in a browser and confirm each one lands on the correct Shopify page, not a 404.
- Transfer meta titles, meta descriptions, and image alt text for every key page. However, these fields do not migrate automatically through CSV.
- Additionally, submit your new Shopify sitemap.xml to Google Search Console the same day you switch your DNS.
- Monitor Google Search Console daily for the first two weeks. Watch for coverage errors and 404s, and fix any broken redirects within 24 hours.
- Expect 2 to 4 weeks of ranking fluctuation. This is normal after any URL-change migration. If rankings don’t recover within 6 weeks, investigate your redirects and on-page metadata.
WPBrigade Insight: Collection pages are often forgotten during URL mapping. If these pages already rank in Google, missing redirects can result in unnecessary traffic loss even when product URLs are redirected correctly.
For deeper technical guidance, Google’s Search Central documentation on site moves with URL changes covers redirect best practices in detail.
Additional SEO Checklist
Don’t overlook these tasks in your Shopify migration checklist:
- Transfer canonical tags.
- Recreate structured data.
- Verify robots.txt.
- Update internal links.
- Regenerate XML sitemap.
- Transfer image alt attributes.
- Verify pagination.
- Reconnect Google Merchant Center.
- Reconnect GA4 and Google Ads.
Don’t Forget Analytics and Marketing Tracking
Before launching your Shopify store, reconnect every analytics and marketing platform used on your WooCommerce store. Verify GA4 ecommerce events, Google Tag Manager, Google Ads conversions, Meta Pixel, Microsoft Clarity, Merchant Center, and email marketing integrations. Launching without validating tracking can result in missing sales data and inaccurate reporting.
Warning: Don’t point your domain to Shopify until you’ve completed checkout testing, redirect verification, and analytics validation.
How Long Does a WooCommerce to Shopify Migration Take?
The time it takes to move your WooCommerce store to Shopify depends on store size. Small stores with under 500 products typically take 1 to 3 days. Medium stores take 1 to 2 weeks, and large stores with complex data or custom functionality take 4 to 8 weeks.
| Store Size | Products | Migration Duration | Who Should Handle It |
| Small | Under 500 | 1 to 3 days | DIY or migration app |
| Medium | 500 to 5,000 | 1 to 2 weeks | Migration app or agency |
| Large | 5,000+ or custom functionality | 4 to 8 weeks | Agency |
In fact, rushing the migration to meet an arbitrary launch deadline causes errors that take longer to fix than the time you saved.
When Should You Hire an Agency to Handle the Migration?
Hire a development agency for your WooCommerce to Shopify migration when your store has more than 1,000 products, relies on significant organic traffic, uses custom WooCommerce plugins, or runs a complex checkout or subscription setup.
Six signals it’s time to bring in help:
- More than 1,000 products with complex variants, custom fields, or metafields.
- A significant share of revenue comes from organic search, where a bad migration can take months to recover from.
- Custom-built WooCommerce plugins with no direct Shopify equivalent that need to be rebuilt.
- Subscriptions, memberships, or complex pricing rules built into your store.
- Integrations with ERP, accounting, or fulfillment systems that need to be re-wired for Shopify’s API.
- You can’t afford weeks of post-launch debugging or downtime.
WPBrigade manages end-to-end WooCommerce to Shopify migrations, including data migration, custom Shopify theme development, SEO preservation, app configuration, integrations, quality assurance, and post-launch support.
FAQs
Final Thoughts
Migrating from WooCommerce to Shopify is manageable once you know what transfers automatically and what needs manual action. Ultimately, the merchants who migrate successfully are the ones who protect their SEO, plan the theme rebuild, and handle the customer password reset before launch, not after.
Here’s what to do next:
- Run a pre-migration audit this week. Export every indexed URL with a site crawler, pull your current Search Console data, and document all custom plugin functionality. It takes a few hours and prevents weeks of post-launch debugging.
- Choose your migration method based on store size. For under 500 products with minimal SEO dependency, use Shopify’s Store Importer app and follow this guide step by step. Over 500 products or significant organic traffic: plan for a managed migration before touching any data.
- Start your Shopify theme selection now, not after your data is migrated. This is because the choice of theme affects how your collections, navigation, and product pages are structured, and deciding early prevents a rebuild later.
Protect your data, your rankings, and your launch date. Explore WPBrigade’s Shopify Development Services.
You may also like to read: WordPress Migration Projects: Risks, Planning, and Best Practices

Leave a Reply