
Every time a visitor opens a post, the Related Posts Thumbnails plugin may need to determine which posts are related. On a large site, that lookup can add extra database queries to a page load.
To keep your site fast, the plugin includes a built-in cache that remembers the related posts it has already found.
In this documentation, we explain what the cache stores, when it refreshes automatically, and how to clear it manually when you need to.
What the Cache Does #
When the cache is enabled, the plugin saves the list of related post IDs for each post the first time it is viewed. On the next visit, the plugin reuses that saved list instead of searching your database again.
The plugin saves only the list of related posts. The thumbnails, titles, excerpts, colors, and layout are still built fresh on every page load, so any change you make to the look of your related posts shows up straight away.

Tip for Beginners: Think of the cache as a shortlist. The plugin remembers which posts to show, but it always draws them using your latest settings.
How to Enable or Disable the Cache? #
The cache is turned on by default. To change it, follow these steps:
- Log in to your WordPress Admin Dashboard.
- On the left menu, click on Related Posts.
- Open the General tab.
- Find the Cache related post IDs option and check or uncheck it.
- Click Save Changes.
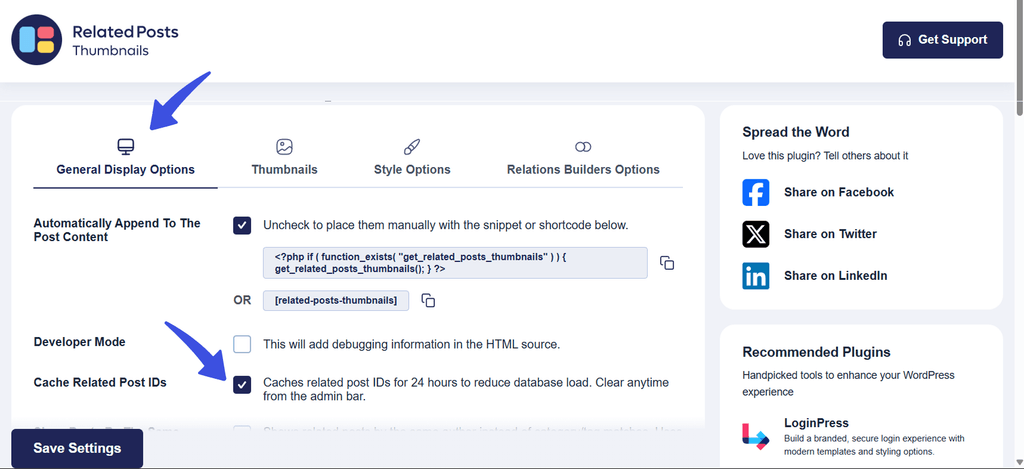
When the option is unchecked, the plugin looks up related posts on every page load, and the Purge RPT Cache link in the admin bar is hidden.
How Long Is the Cache Kept? #
Saved related-post results remain cached for 24 hours. After 24 hours, the cache expires, and the plugin generates fresh related posts the next time someone views the post.
When Does the Cache Refresh Automatically? #
In most cases, you don’t need to clear the cache by hand. It refreshes on its own in the following situations.
What Happens to the Cache When a Post Is Updated or Deleted? #
Whenever you save, update, trash, or delete a post, the saved related posts for that post are cleared. Its related list is rebuilt the next time it is viewed.
What Happens to the Cache When Related-Post Settings Change? #
When you save changes to settings that affect which posts are selected, the plugin automatically clears the cache for the entire site.
These settings include:
- Relation type: categories, tags, both, or custom taxonomies
- Display on Categories and Categories Will Appear in Related Posts
- Include Posts After
- Custom taxonomies
- Sort By
- Number of related posts
- Author related
Settings that only change how related posts look, such as columns, colors, fonts, thumbnail size, title length, or excerpt length, do not require the cache to be cleared. These settings apply immediately because the layout itself is not cached.
What Happens If a Related Post Is Deleted or Unpublished? #
If a saved related post is later unpublished or deleted, the plugin skips that post. If there are not enough valid related posts left, it automatically finds new ones.
This prevents visitors from seeing broken links.
Things to Keep in Mind #
New Posts May Take Time to Appear #
Publishing a new post refreshes the cache for that post only. Older posts that already have saved results will not show your new post as related until their cache expires (within 24 hours) or you purge the cache manually.
Random Order Stays the Same Within the Cache Period #
If Sort By is set to Random, the plugin picks the random posts once and reuses them for up to 24 hours. Visitors will see the same set of related posts for that period instead of a new mix on every reload. Choose Latest Posts, or turn the cache off, if you prefer a fresh selection on every visit.
Page Caching Plugins Are Separate #
This cache works inside the Related Posts Thumbnails plugin. If you also use a page caching plugin or a server cache, clear that cache as well so visitors see the latest page.
How to Clear the Cache Manually #
If you want your changes to apply right away, for example, after publishing several new posts, you can clear the cache for the whole site:
- Log in to your WordPress Admin Dashboard.
- In the top admin bar, click Purge RPT Cache.
- Wait for the confirmation message to appear.
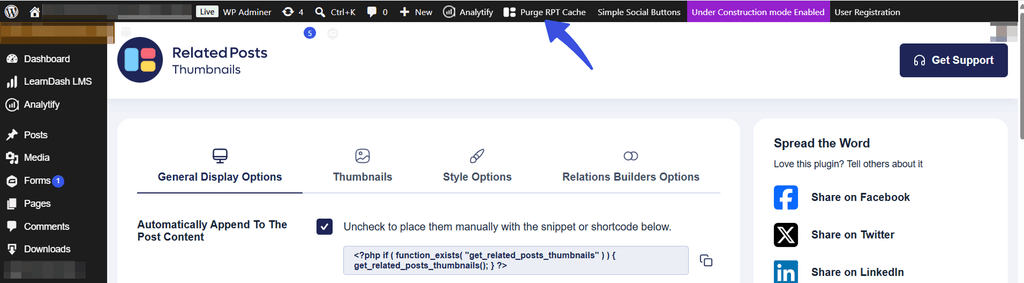
You will see the message Related posts cache purged successfully. On sites with a lot of content, you may instead see Related posts cache purge started. Cleanup will continue in the background. This is normal. The old results stop being used immediately, and the plugin removes the stored data in small batches while you work in the dashboard.
The Purge Cache link is only visible to administrators, and only while the cache option is enabled.
For Developers #
You can control the cache from code using these filters.
Turn the Cache On or Off #
add_filter( 'rpt_related_ids_cache_enabled', '__return_false' );Change How Long Results Are Kept #
The value is in seconds. The example below keeps results for 12 hours.
add_filter( 'rpt_related_ids_cache_ttl', function () {
    return 12 * HOUR_IN_SECONDS;
} );
Change the Cleanup Batch Size #
After a site-wide purge, old data is removed 500 rows at a time. On shared hosting, you can lower this number.
add_filter( 'rpt_related_cache_batch_size', function () {
    return 100;
} );
Frequently Asked Questions #
#
#
#
Keep the Related Posts Cache Enabled for Better Performance #
The Related Posts Thumbnails cache helps reduce the database work needed to find related posts, especially on sites with a lot of content. In most cases, you can leave it enabled and let the plugin refresh the cached results automatically.
If you make changes that affect which posts are selected and need the results to update immediately, use Purge Cache from the WordPress admin bar. If you also use page or server cache, clear it when needed.
For most sites, you can simply enable the cache and let the plugin handle the rest.